Week 9 Learn & Practice - Tables
Textbook
- Chapter 8: Table Markup
Use tables when you need to display tabular data (rows and columns) on a website, for example, calendars, schedules, or statistical data. It can contain images, numbers, text elements, or even multimedia.
Simple Tables
| Element | Purpose |
|---|---|
<table> |
Creates a table |
<tr> |
Creates a table row |
<td> |
Create a table cell (table data) |
<th> |
Create a table header |
-
Download the week09Demo_tables file and open the tables.html document in VS Code and your browser.
-
Under the comment,
<!-- Start your simple table here -->add a<table>element.<main> <h2>Groceries</h2> <!-- Start your simple table here --> <table> </table> </main> -
Add four table rows
<tr>under the<table>element. The, notice that nothing has appeared in the browser yet. We need to add table data to display anything to the page.<table> <tr></tr> <tr></tr> <tr></tr> <tr></tr> </table> -
Add three table data elements,
<td>within each<tr>element. Add content inside each cell, like below. Pay attention to the indentation, so that elements nested within each other are indented. I’ve added comments to indicate each HTML table row.<table> <!-- Row One --> <tr> <td>Item</td> <td>Price</td> <td>Quantity</td> </tr> <!-- Row Two --> <tr> <td>Milk</td> <td>$2.69</td> <td>1</td> </tr> <!-- Row Three --> <tr> <td>Apples</td> <td>2.89/lb</td> <td>1 lb</td> </tr> <!-- Row Four --> <tr> <td>Bread</td> <td>$2.79</td> <td>2</td> </tr> </table> -
Edit your first three cells table headings by changing the
<td>elements to<th>elements. The<th>elements automatically style the text bold.<table> <!-- Row One --> <tr> <th>Item</th> <th>Price</th> <th>Quantity</th> </tr>
Table Styles
-
Open the tables.css file in VS Code and start by making a border around the table. Remember that the border shortcut property takes three values: border width, border style, and border color.
table {border: 2px solid blue;} -
Add a border to the
<td>elements in a different color than the<table>border.td {border: 2px solid red;}Where is the red border?
Why didn't we get a red border around the first cell? How can we achieve a red border there?
These borders produce a separated, detached border that isn't very appealing. To create a single border, we need to collapse the border.
-
Use the
border-collapseproperty to collapse the border.table { border: 2px solid blue; border-collapse: collapse; }The
border-collapseproperty collapses the borders on the<td>elements into a single border. The blue border on the<table>element is behind the red border. -
Add some
paddingto create some space around the content in our<d>and<th>elements.td, th { border: 2px solid red; padding: 1em; } -
Center the table to the webpage. To center any block-level element, we apply
margin-left: autoandmargin-right: autoto the element. Theautovalue, forces equal margins on both the right and left, which places the element in the center of its container. -
Below the shortcut is being used on
margin. The top and bottom are receiving0margin, while the left and right are receivingautomargin.table { border: 2px solid blue; border-collapse: collapse; margin: 0 auto; } -
Expand the
widthof the table to70% -
Add a style to change the
background-colorto be a light color.
Styling One <td> Element
To style a single <td> element, we need to place and id attribute on the element we wish to style.
-
Add an
idattribute to the first<th>cell in the HTML document. -
In CSS, apply a style to the
<th>element you just placed an id on and give it a width of60%. Then, notice the width applies to the entire column.
Adding Images to Tables
The content of a table can be anything: text, links, images, etc.
-
Replace the text "Milk", "Apples", and "Bread" with the images in the images directory. Don't forget to include the
altattribute! -
The images look nice, but it would be better if they could fit the size of our table cell. Do this by applying a width of
100%to the images using CSS. Then, the images fit our cell, and they even change size when we change the size of our browser window. -
Apply a
pseudo-classhover selector to give the image a shadow when the mouse hovers over it. The hover pseudo-class can be applied to any element!img:hover {box-shadow: .1em .1em .2em grey;}
Grouping Table Content
You can describe table rows as belonging to a header, footer, or the body of the table using ,
, and elements.-
Open the Chrome Developer Tools (F12) if it's not already open and inspect the HTML of the table. Notice, that Chrome has automatically added a
<tbody>element to our table. A table must have the<tbody>element, and if you don't add one, the browser adds it for you. -
Nest the
<th>in a<thead>element.<thead> <tr> <th id="items">Item</th> <th>Price</th> <th>Quantity</th> </tr> </thead> -
Style the
<thead>element with a different background color. - Increase the size of the
<th>elements nested inside the<thead>element.
Alternating Background-Color
It's common to alternate the background-color color of rows to increase the legibility of the table. We could add a class attribute to alternate rows and give the class a different background-color; however, there is a handy pseudo-class selector that makes this easier.
-
If you didn’t add them earlier - add two more rows to our table with three
<td>each.<tr> <td><img src="images/butter.jpg" alt="butter in a pile of flour"></td> <td>$3.99</td> <td>1</td> </tr> <tr> <td><img src="images/cookies.jpg" alt="cookies baking"></td> <td>$4.17</td> <td>6</td> </tr>
:nth-child() Selector
The :nth-child() selector matches children of a certain element. We put a number inside of the parentheses to determine which descendants we want to target, for example, the selector p:nth-child(2) matches every <p> element that is the second child of its parent.
For tables, we can target the even or odd rows with tr:nth-child(even) or tr:nth-child(odd).
-
Apply a
background-colorof white to the even rows of the table. This is targeting all the<tr>elements that are and even descendants of their parent.tr:nth-child(even) {background-color: white;}
Complex Tables
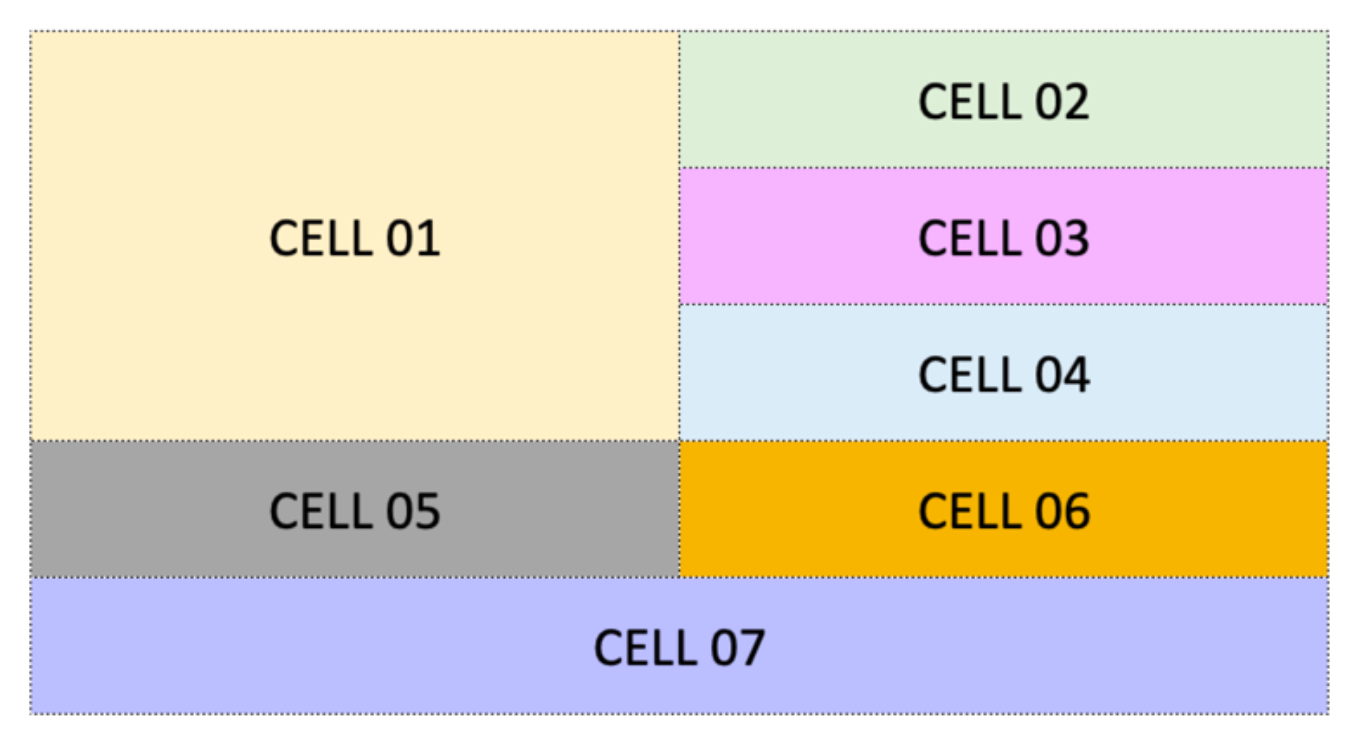
Look at the table below; this is a more complex table as some of the cells stretch to cover several rows or columns.
To stretch table cells, we use a method called cell "spanning".
- Cell 01 spans several rows
- Cell 07 spans several columns
-
From the Download the week09Demo_tables folder, open the complex.html document.
-
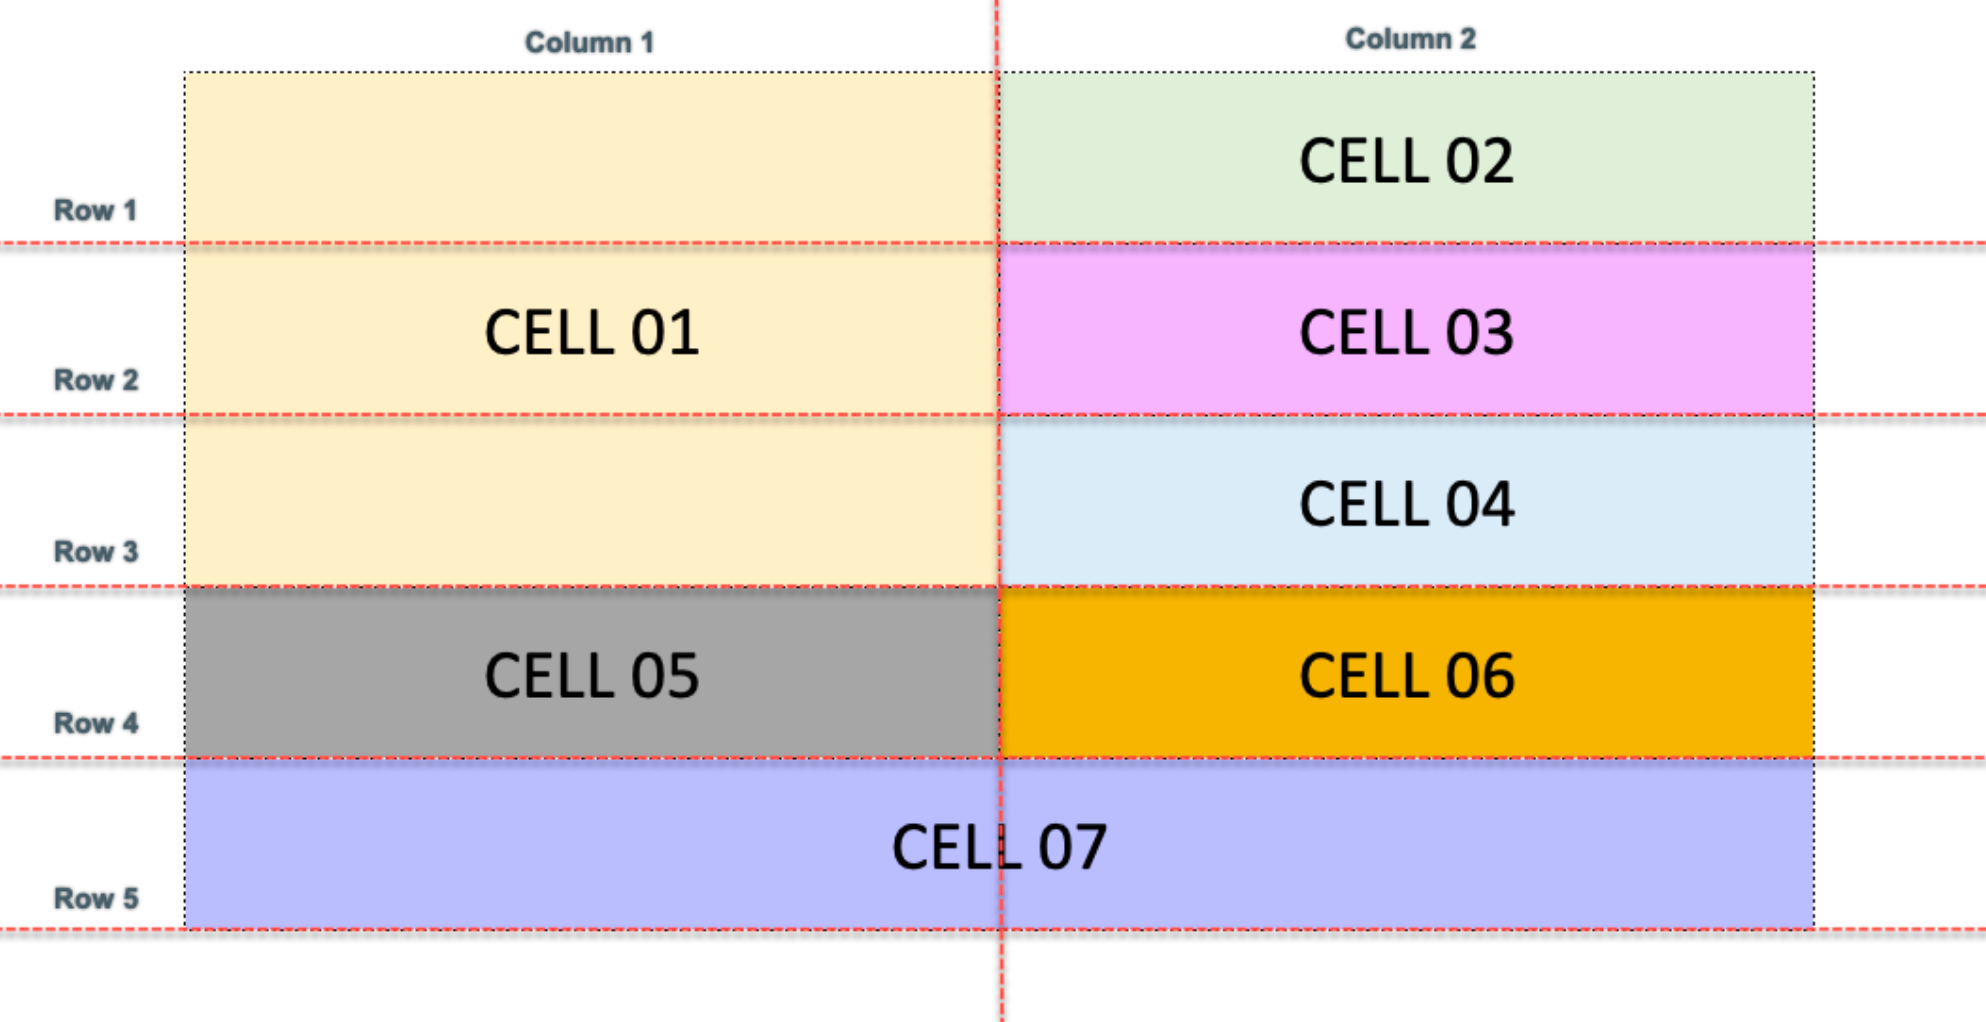
Start by building a regular table with seven
<td>element for each cell. Add some CSS borders to help see the table in the browser better. It’s also a good idea to add a little padding to make the cells a little bigger to work with them visually.Next, we need to add the rows to the table. Determine the numbers of rows in the table by drawing horizontal lines across the table to see where each row exists. Below you can see that we have five rows.<main> <!-- Start your complex table here --> <table> <td>cell 01</td> <td>cell 02</td> <td>cell 03</td> <td>cell 04</td> <td>cell 05</td> <td>cell 06</td> <td>cell 07</td> </table>- Row 1 contains cell 01 and cell 02.
- Row 2 contains cell 01 (already belongs to row 1) and cell 03
- Row 3 contains cell 01 (already belongs to row 1) and cell 04
- Row 4 contains cell 05 and cell 06
- Row 5 contains cell 07
-
Add in the
<tr>(table rows) around the appropriate<td>elements. Refresh and view the website.Our table still doesn't look like the picture.
We need to apply two attributes to our HTML table:
rowspanandcolspan. Look at the image above.How many rows does cell 01 take up or span? How many columns does cell 07 take up or span?
Spanning a cell stretches the cell to cover several rows or columns. Spanning allows you to create complex table structures.
-
Apply the
rowspanattribute to the cell 01<td>element. Give it the value of3. Refresh and view the results.<td rowspan="3">cell 01</td> -
Apply the
colspanattribute to the cell 07<td>element. Give it the value of2. Refresh and view the results.<td colspan="2">cell 07</td>