Project 1 Guide
Get started on project 1 immediately!
Do what you know and check it off, you can come back and finish more later. The point is to not leave it to the last minute, otherwise, you will not finish.
Overview
A local coffee shop, Crown Coffee, serves the Madison community offering a small menu, caffeinated beverages, and a coffee club for users to join. The first two projects in this course will consist of expanding and enhancing this website.
For Project 1, HTML will be used to develop webpages. In future projects, you will add CSS, and some additional HTML.
Learning Objectives
- Practice semantic HTML structure
- Build multi-page website navigation
- Use character entities, links, images, and validation tools
Directory Structure
The directory structure of Project 1 will be like the coding practices. The directory structure should be created in your class folder on your external hard drive.
- In your class folder (Web Development), create a folder for project01
- Create three sub folders named stylesheets, images, and validations
Add HTML Files
This step will set up your proper folder structure. When finished, you will have 6 HTML files:
- index.html
- coffee.html
- coffeeGuide.html
- menu.html
- club.html
- contact.html
Steps for creating each HTML page
Create a new file named index.html and save it into the project01 folder
- Go to HTML Starter Code and copy the starter HTML code.
- Paste the code into the index.html file and save
- Modify the name and date in the comments section and save
- Repeat this process for the remaining 5 HTML pages, naming the files according to the list above
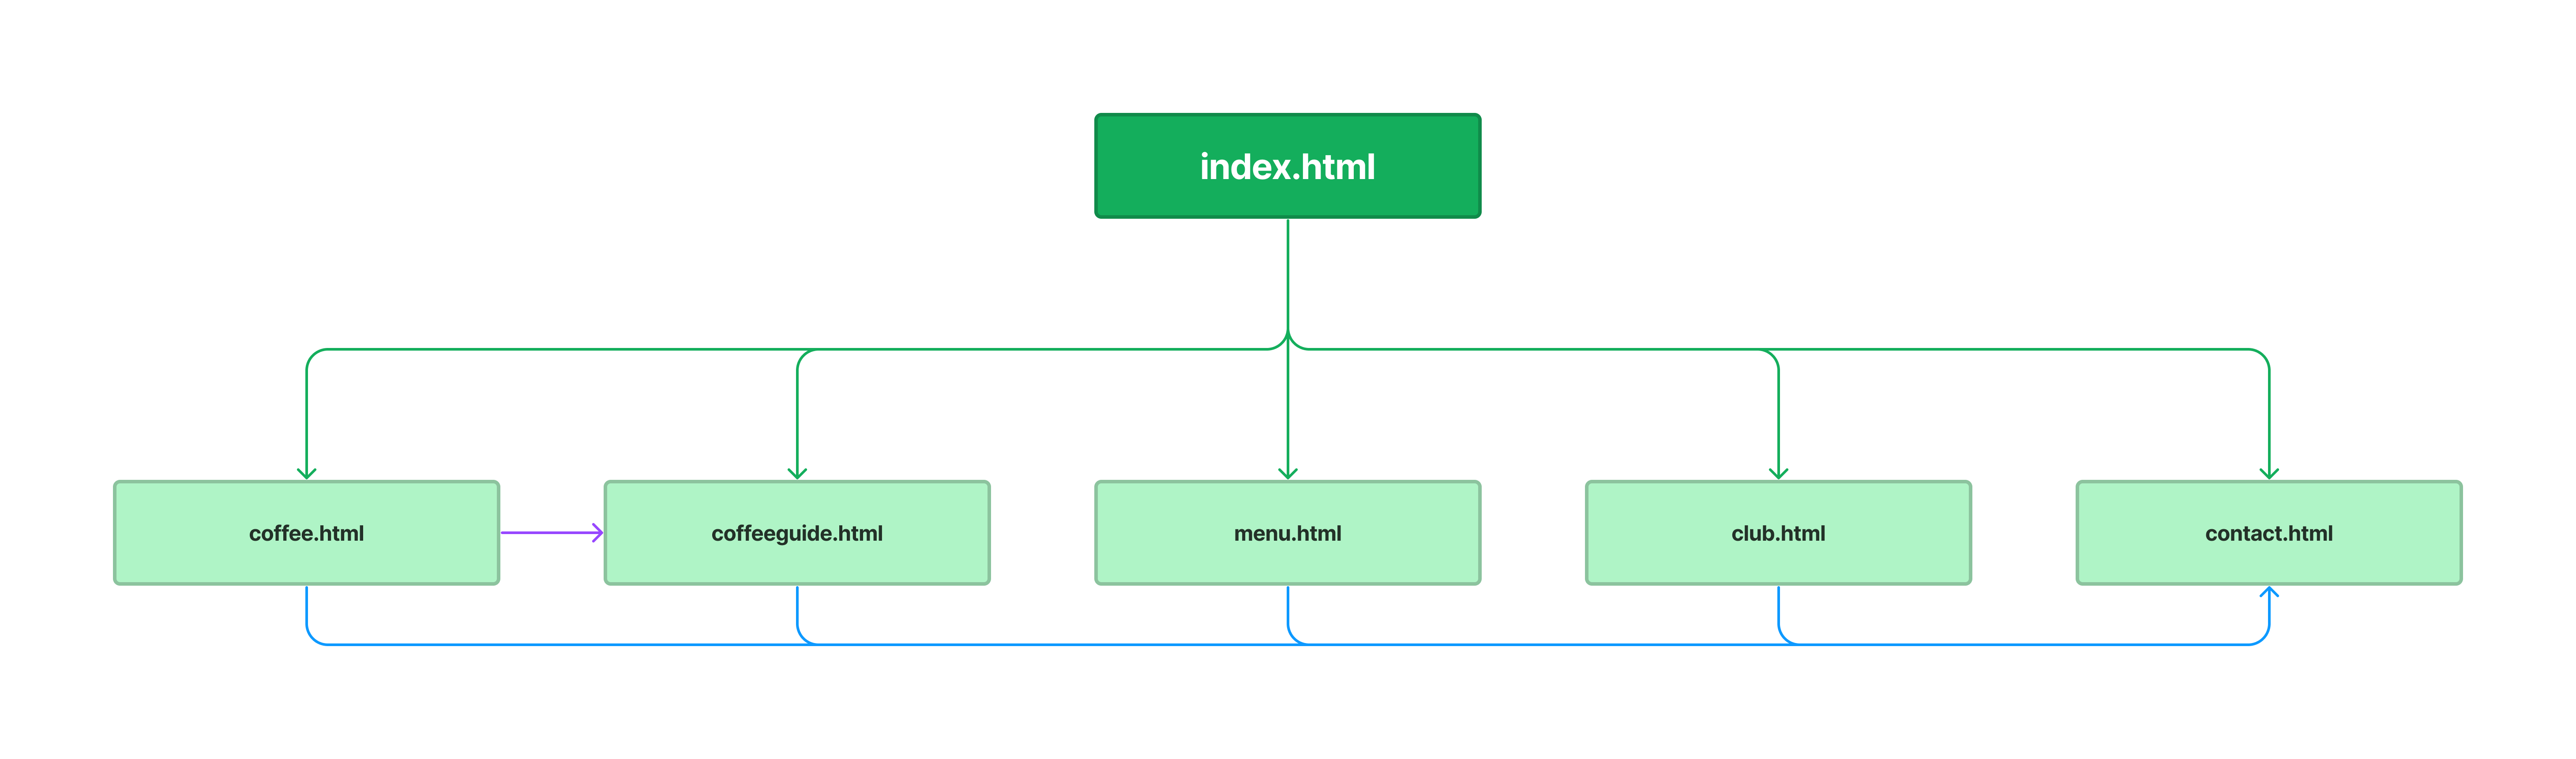
Project Sitemap
A sitemap is a tool that helps visualize the website structure. Below you see the HTML files you need to create for this project. The lines illustrate links to each of the pages. The homepage links to each page, and each page links to the contact.html page.
Add Images
- Download the Project 1 images ZIP file.
- Unzip (uncompress) the file.
- Open the unzipped folder.
- Move only the image files into your images folder.
- Do not move the entire unzipped folder into images, or you will end up with nested folders.
Validation
All HTML documents must be validated prior to submission.
- Go to https://validator.w3.org/
- Click on the Validate by File Upload
- Click on the Choose file button and navigate to the location of your HTML document.
- Click the Check button
- Print it as a PDF and save it into a folder named validations in your project01 folder
- Name the PDF indexValidation.pdf.
- Repeat this process for each html pages, renaming the file per page.
Grading
Your screen resolution may vary, so depending on your screen size and resolution, your website may differ from
the example images provided. Regardless of this, your website should look acceptable on all screens. The main
thing I am grading is the STRUCTURAL formatting of your web pages. However, do not forget to run your .html
pages through a validator correcting any errors or major warnings.
Quick check list - double-check everything!
- I created all 6 HTML files (index, menu, coffeeGuide, coffee, club, and contact pages)
- I linked all pages correctly
- I added all required images
- I validated every HTML page, and saved each PDF
- I named all files and folders correctly
The following will be assessed on Project 1
- Course Coding Standards are followed on all pages. 1 - 15 apply.
- Correct directory structure, file names, and validation PDFs.
- Correct implementation of HTML semantic elements
- Correct use and implementation of images.
- Correct use and implementation of HTML lists.
- Proper use of character entities for special characters.
- Correct implementation of links, including email, telephone, and document fragments.
- Proper use of
idandclassattributes. - Thoughtfulness and completeness of reflection questions (below).
Submission
Part 1: Reflection
- Locate the submission link for Project 1 in Brightspace (Unit 1 > Week 5 > Project 1).
- Copy the below text (there is a copy icon in the upper-right of the textarea) and paste it into the Comments section.
- Answer the questions.
1. Tell your Project "story". Describe how it unfolded, from its overall learnings to the obstacles and pitfalls you encountered along the way, whether they made you cringe, caused frustration, or left you exclaiming "oh no!" Elaborate on the creative approaches and solutions that took you from "oh no!" to "I got this!". Emphasize the significant takeaways and knowledge you acquired throughout the project's journey.

2. Based on this unit, list three things you want to focus on improving on in the next unit.

3. Are you interested in completing the Project 1 Swap & Review challenge? If yes, I will pair you with another student so you can review their work and they can review yours.
Part 2: Upload .zip
- Compress your entire project01 folder to a .zip (zipped) file.
- Do not zip the projects or Web Development folders.
- You should have the follow files/folder in the zip file:
- images (folder) with images
- styleSheets (folder)
- validations (folder) with 6 PDFs for index, coffee, coffeeGuide, menu, club, and contact HTML pages
- index.html
- coffee.html
- coffeeGuide.html
- menu.html
- club.html
- contact.html
- Click on "Upload" to upload your .zip file or you can drag and drop it into the submission window.
- Click "Submit"
Submitting Corrections
You have the opportunity to revise and resubmit your Project 1 once after it has been graded. This allows you to correct mistakes and demonstrate improved understanding.
How to Submit Corrections
- Locate the submission link for Project 1 in Brightspace (Unit 1 > Project 1).
- Copy the below text (there is a copy icon in the upper-right of the textarea) and paste it into the textarea that appears under the Comments section and answer the reflection questions.
- Upload your newly zipped project folder and click Submit.
Reflection Questions
 REQUIRED with resubmission
1. What specific corrections did you make?
(List the changes clearly. Be specific—e.g., “I added a missing alt attribute to my image tag.”)

2. Why did each mistake happen?
(What was the misunderstanding or oversight behind each one? Be honest and curious.)

3. How has your understanding of HTML improved through this process?
(Describe what you now know or see differently.)

4. What will you do differently in the future to avoid similar mistakes?
(This could include strategies like proofreading your code, using checklists, asking questions earlier, or using validation tools.)
Tip
- Think of this as a learning opportunity, not just a fix-it task.
- Use your original feedback as a guide.
- Be reflective—quality answers matter and help me understand your growth.
If Issues Remain After Resubmission
If your revised project still has significant issues or your reflection answers are incomplete or lack detail, you’ll be required to meet with me one-on-one to review your code and clarify your understanding before any additional resubmissions are accepted.
This meeting is intended to:
- Help you strengthen your HTML skills
- Clarify recurring errors or misconceptions
- Support your continued success in the course
- You’ll receive an Slack message with scheduling instructions if a meeting is needed.