Week 7 Learn & Practice - CSS Intro
Textbook
- Chapter 11: Introduction to CSS
Cascading Style Sheets (CSS)
Image source: Oxford Web Studio
Once we have the structure of a document (HTML) created, we can begin to work on the presentation layer (CSS). The correct HTML structure is extremely important, as this makes creating the styles easier.
- Cascading Style Sheets (CSS) is the W3C standard for defining the presentation of documents written in HTML and any XML language.
- CSS is a separate language with its own syntax.
- CSS describes how HTML elements are displayed on the screen.
- CSS can control the layout of multiple pages all within a single document.
- Typically, CSS documents are stored within their own directory. We store them in our styleSheets directory.
Benefits
- Precise type and layout controls: You can achieve print-like precision using CSS. There is even a set of properties aimed specifically at the printed page.
- Less work: You can change the appearance of an entire site by editing one stylesheet. Code once and apply it multiple times - reusability!
- Accessible sites: When all matters of presentation are handled by CSS, you can mark up your content meaningfully, making it more accessible for non-visual or mobile devices.
- Reliable browser support: Every browser in current use supports CSS Level 2 and many cool parts of CSS3
Disadvantages
- Lingering hassles from browser inconsistencies.
Zen Garden
- Visit www.csszengarden.com
- This is an old site, but it shows how the same HTML can be transformed in a multitude of ways by just altering the CSS
- No
<img>elements were used in these designs
Embedded Stylesheets
An embedded style sheet is placed inside the<head> element of your HTML document.
- Download week07Demo_part01 and open the website in VS Code and your browser.
-
Create an embedded stylesheet on the index.html file by adding a
<style>element inside the<head>.<head> <title>Homemade Peanut Butter</title> <meta charset="UTF-8"> <style> </style> </head> -
Add a CSS style rule to the
<h1>element so that it has red text. We will cover the syntax in more detail later, so for now, just type what you see highlighted in yellow.<head> <title>Homemade Peanut Butter</title> <meta charset="UTF-8"> <style> h1 {color: red;} </style> </head> -
Refresh your browser to see the changes. Do you have a red level-one heading?
Embedded stylesheets work, but they should be avoided for the following reasons:
- They only style the current page. What if I wanted all my
<h1>element on my website to be red? I'd have to duplicate this style on every page! This would be very difficult for sites that have hundreds of pages. - If I had styles repeated on every page, changing the styles would also become tedious. Imagine going into one hundred different files to change the color of some text!
- Avoid having HTML and CSS in the same document. We want to keep our HTML and CSS separate. Separating our code keeps our work clean, maintainable, and easier to manage.
Inline Styles
We can also make styles inline with the style attribute. Inline styles have the same pitfalls as embedded stylesheets and should be avoided.
- Find the
<h1>Homemade Peanut Butter</h1>element on the index.html page. -
Add the style attribute to the opening
<h1>element<h1 style="">Homemade Peanut Butter</h1> -
Add a style value
color: blue;to the attribute<h1 style="color: blue;">Homemade Peanut Butter</h1> -
What color is your
<h1>element now? Red or Blue? What does that tell you about inline styles and embedded styles?Note on Embedded or Inline styles
Sometimes, developers use embedded or inline styles to add a style for debugging or testing purposes. It's good to know these styles exist, but they are not allowed in this class. We will learn a better way!
-
Delete the embedded and inline styles created above. We don't need these anymore.
External Stylesheets
An external stylesheet is a separate document that holds all your styles.
- In the styleSheets directory of our website, create a new file in VS Code and name it main.css. An external stylesheet always has the extension of .css.
-
Add a CSS comment, including your name and date. Just like in our HTML documents, we need to start with a comment. CSS comments look like the following:
/* Your Name Today's Date */ -
Create a style for the
<h1>element to render in red text.h1 {color: green;}Note on CSS formatting
When there is only one style rule, developers save space by condensing the CSS to one line. However, a a style with one declaration can be written on three lines (as shown below). Use caution: when writing CSS (just like with HTML) keep the code clean and tight to improve readability.
h1 { color: green; } -
If you save and refresh the browser, you will notice that our level-one heading is not green. We must connect our external style sheet to the HTML document.
-
Go back to the HTML document and add the following to the
<head>section.<head> <title>Homemade Peanut Butter</title> <meta charset="UTF-8"> <link rel="stylesheet" href="stylesheets/main.css"> </head>rel="stylesheet": Defines the linked document as a stylesheet document.href="stylesheets/main.css": We've seen thehrefbefore. This tells the HTML document where to find the CSS stylesheet. We use a relative path.- Do you see the changes now? The
<h1>text should appear in green.
-
Add the same main.css style sheet to the peanutButterVariations.html document.
- Any style we add to the main.css stylesheet will be applied to both the index.html and peanutButterVariations.html HTML document.
Using the Developer Tools
Chrome Developer Tools are a developer’s best friend. We are going to cover some of the basics in using them for debugging our HTML and CSS.
-
In your browser, open the Developer Tools by going to the menu’s three vertical dots in the top right. Select Menu > More tools > Developer tools or use a shortcut:
- CTRL + SHIFT + I (windows)
- Command + Option + I (mac)
- F12 key (widows or mac)
-
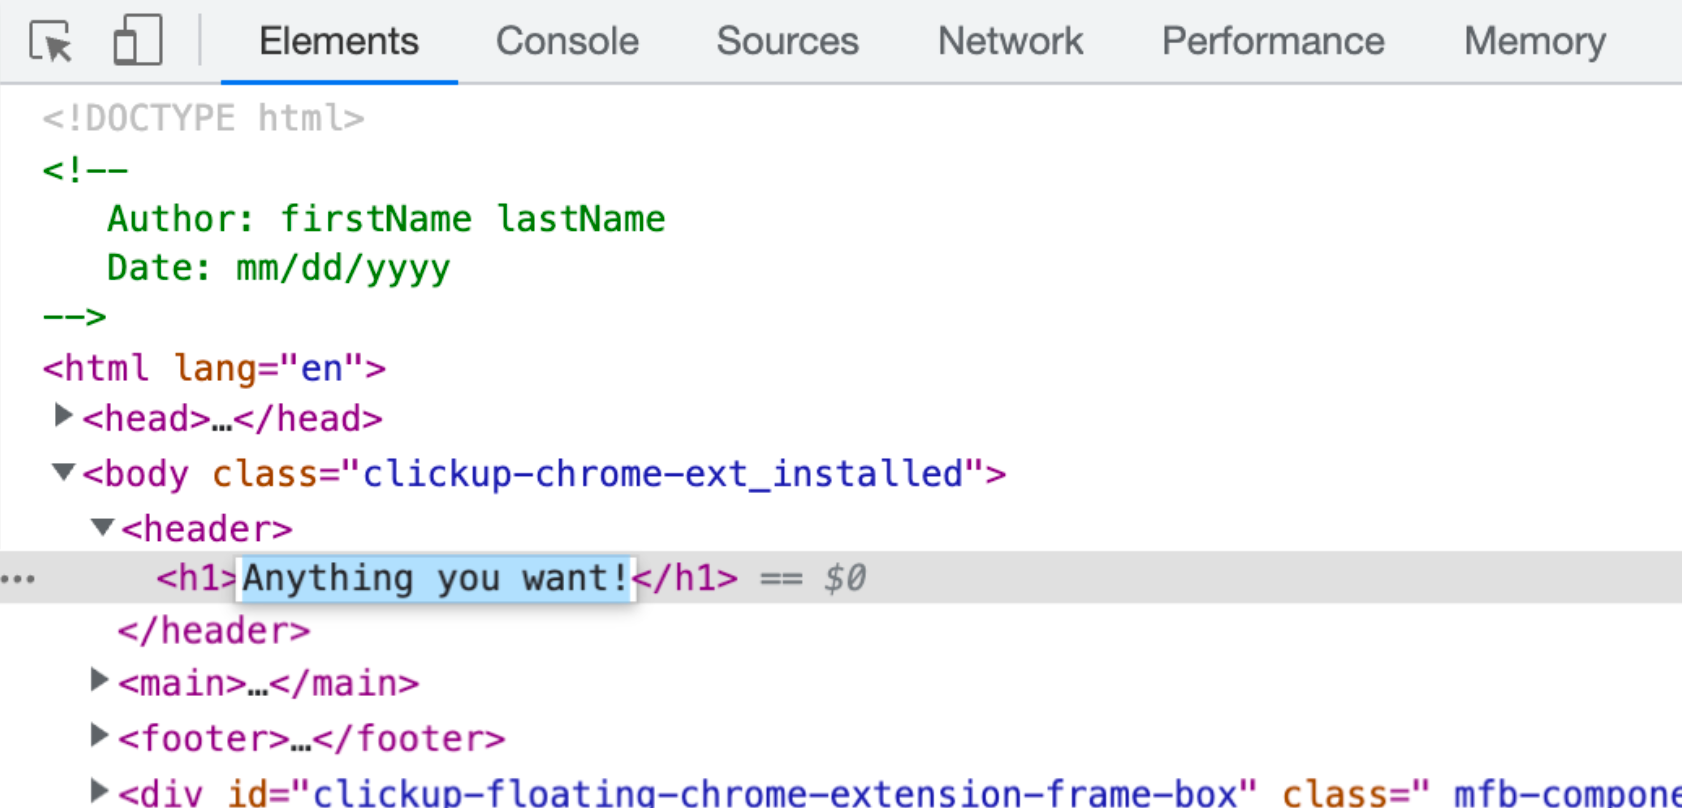
Locate the tabs running along the top of the Developer Toolbox. For this course, we are primarily interested in the Elements tab.
- The HTML of the current page appears on the left. You can select different HTML elements by clicking directly on this panel. If you click on a right-arrow, it will open, displaying more of the HTML.
-
The selected element appears highlighted in blue (in the picture below, it's the
<body>element). The selected element's CSS styles will display in the Style tab in the right panel.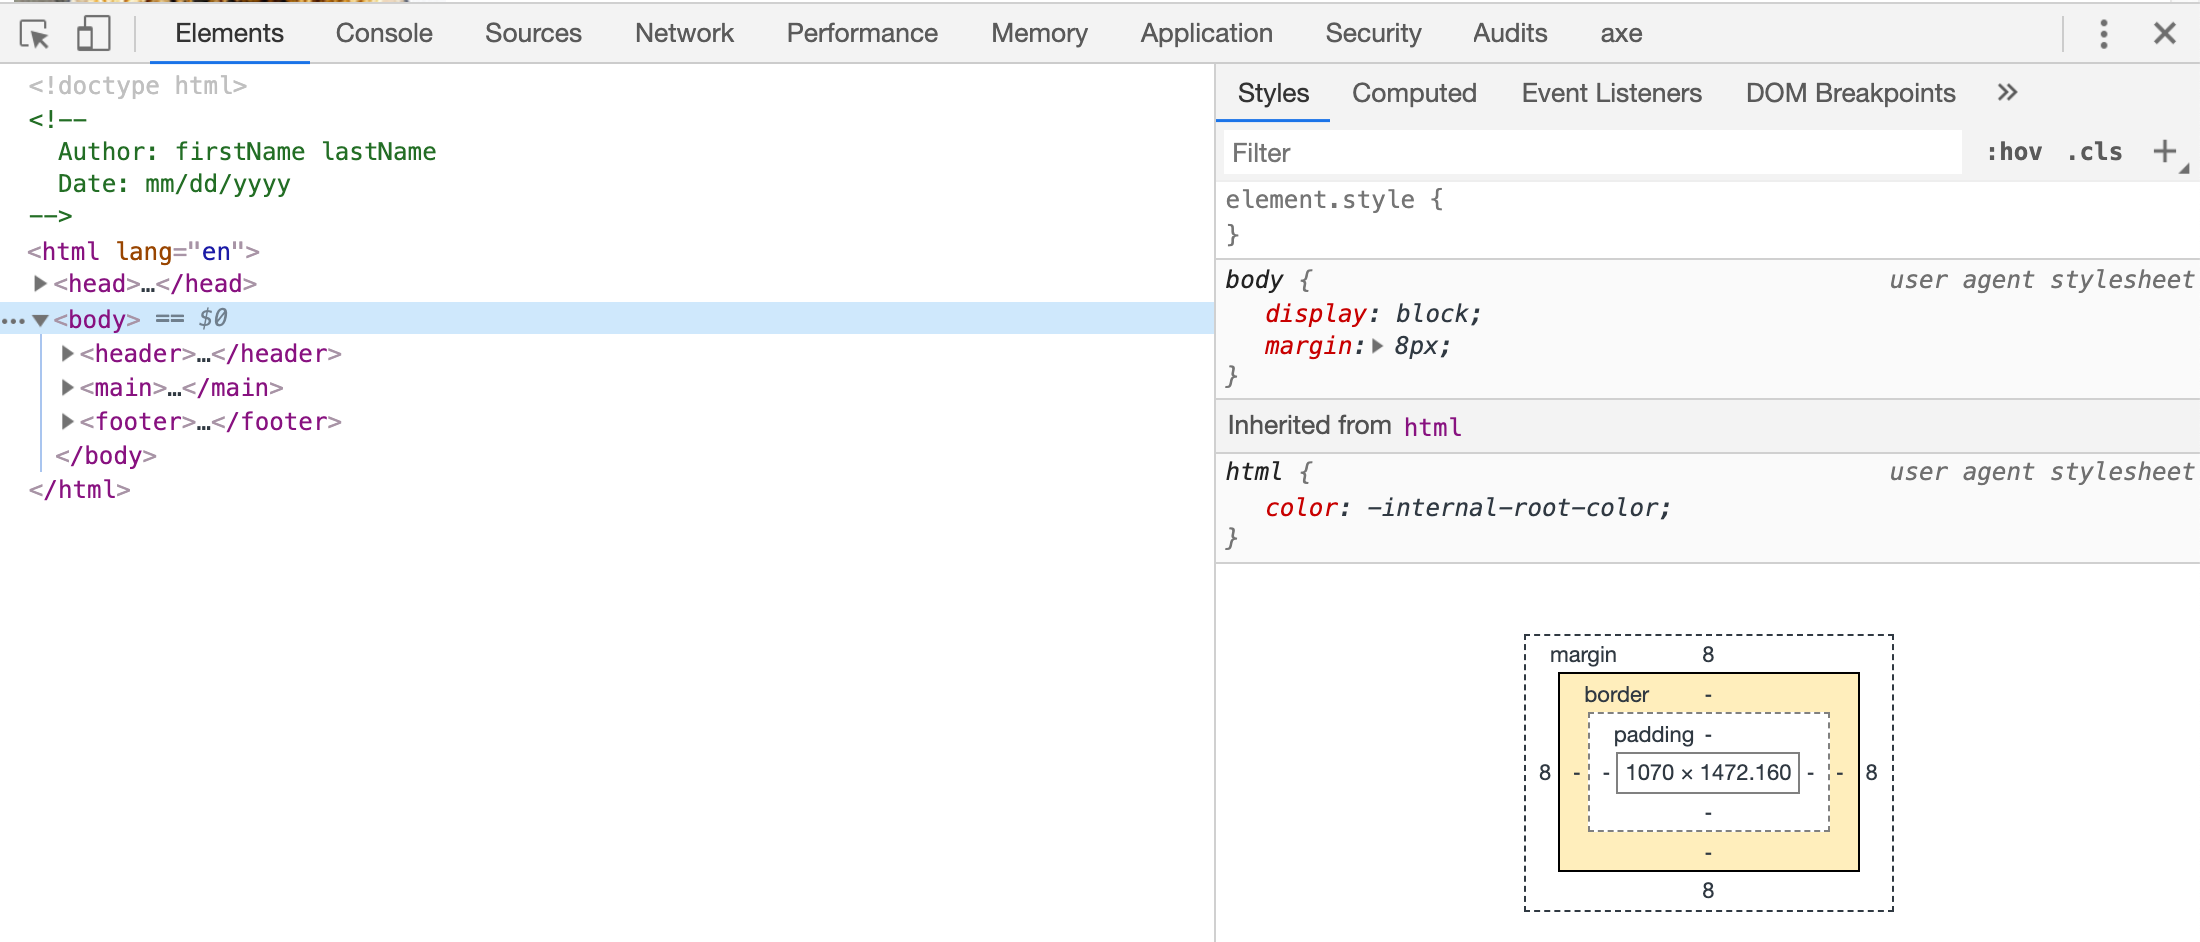
-
Spend some time viewing the HTML in the Developer Tool, paying attention to the CSS that displays in the right panel.
-
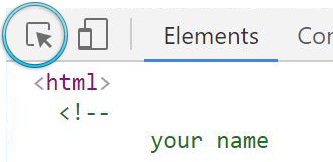
You can also select HTML elements by using the element inspector in the top-upper-left of the Developer Toolbox.
-
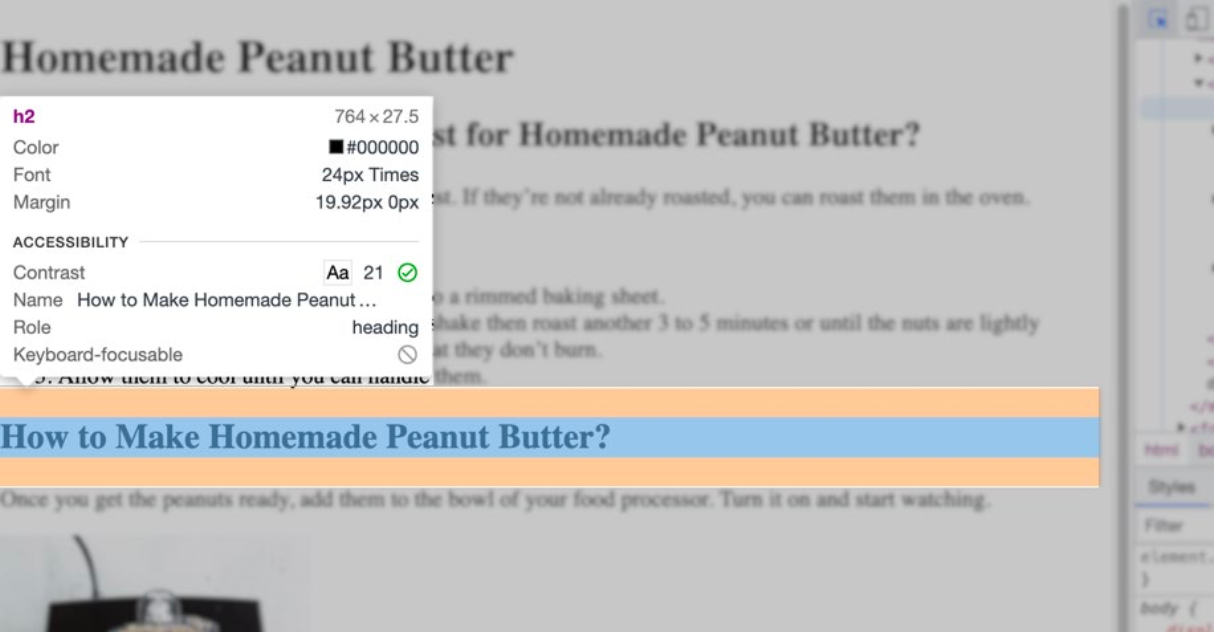
Click on the Inspect Element icon and hover your mouse pointer over the HTML page. Notice how it highlights the element you are hovering over. Clicking on an element will focus the Developer Toolbox on this element.
- Notice that the inspector tells you the element type, size, color, font, and margin. (More on margins later)
- Clicking on the Inspect Element icon again turns this off.
-
You can even temporarily test new HTML and CSS. In the Developer Tools left panel, locate the
<h1>Homemade Peanut Butter</h1>element and double-click on the text. Change the text to whatever you like and click Enter on your keyboard.- This only changes the HTML in the browser, not your source code.
-
Refresh your browser to clear your changes.
-
With the
<h1>Homemade Peanut Butter</h1>element selected in the left panel, look at the right panel where the CSS is listed. You should see the styles we made earlier.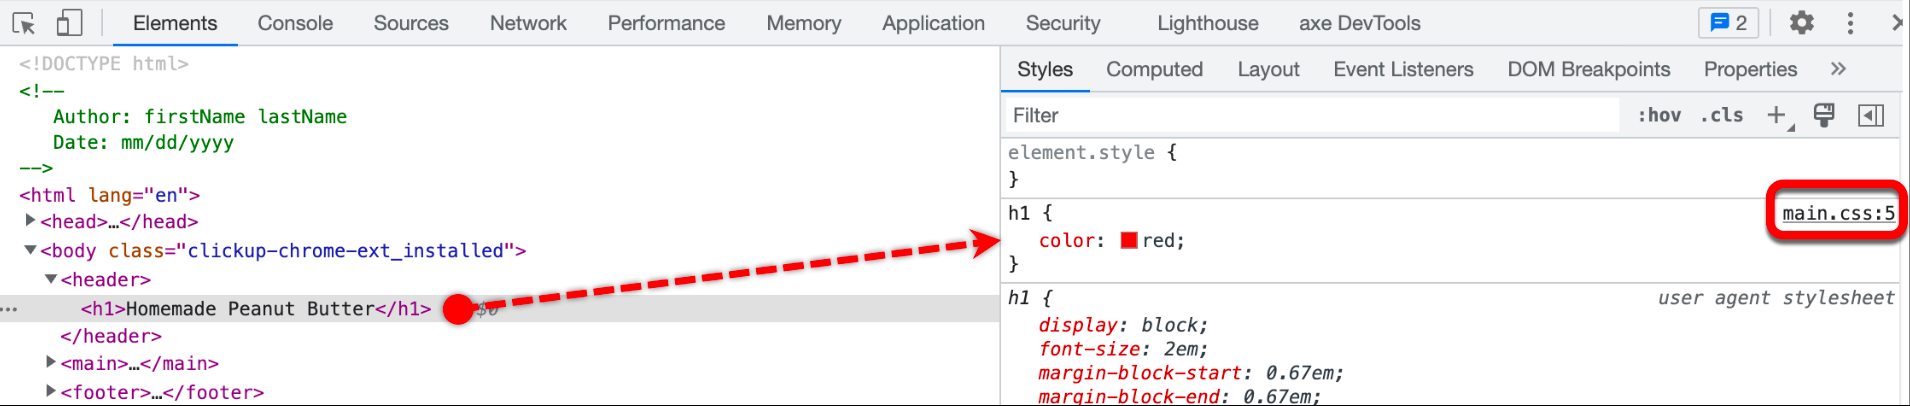
-
Click on the red box. You can test different colors to find one you like!
- Remember, this only changes the CSS in the browser, not your source code.
-
Refresh your browser to clear any changes.
Practice, practice, practice!
We will be looking and using the Developer Tools throughout the remainder of the course, so spend time playing with the tool and becoming familiar with it.
Create an External Stylesheet
Well Structured HTML Comes First!
Once we have the structure of a document (HTML) created, we can begin to work on the presentation layer (CSS). The correct HTML structure is extremely important, as this makes creating the styles easier.
-
Download the week07Demo_part02 file from Brightspace and open the website in VS Code and your browser.
Can you spot the HTML error?
There is a HTML error in this demo code. Can you find it?!
-
Create a new CSS document in your styleSheets folder. Name it index.css.
-
Add a CSS comment to the top of your CSS document, which includes your name and date.
/* Your Name Today's Date */ -
Link the index.css document to the index.html document by using the
<link>element in the<head>section.- The
type="text/css"attribute and value is optional.
<link rel="stylesheet" href="styleSheets/index.css" type="text/css"> - The
Style Rules
-
Add a style to our stylesheet for the
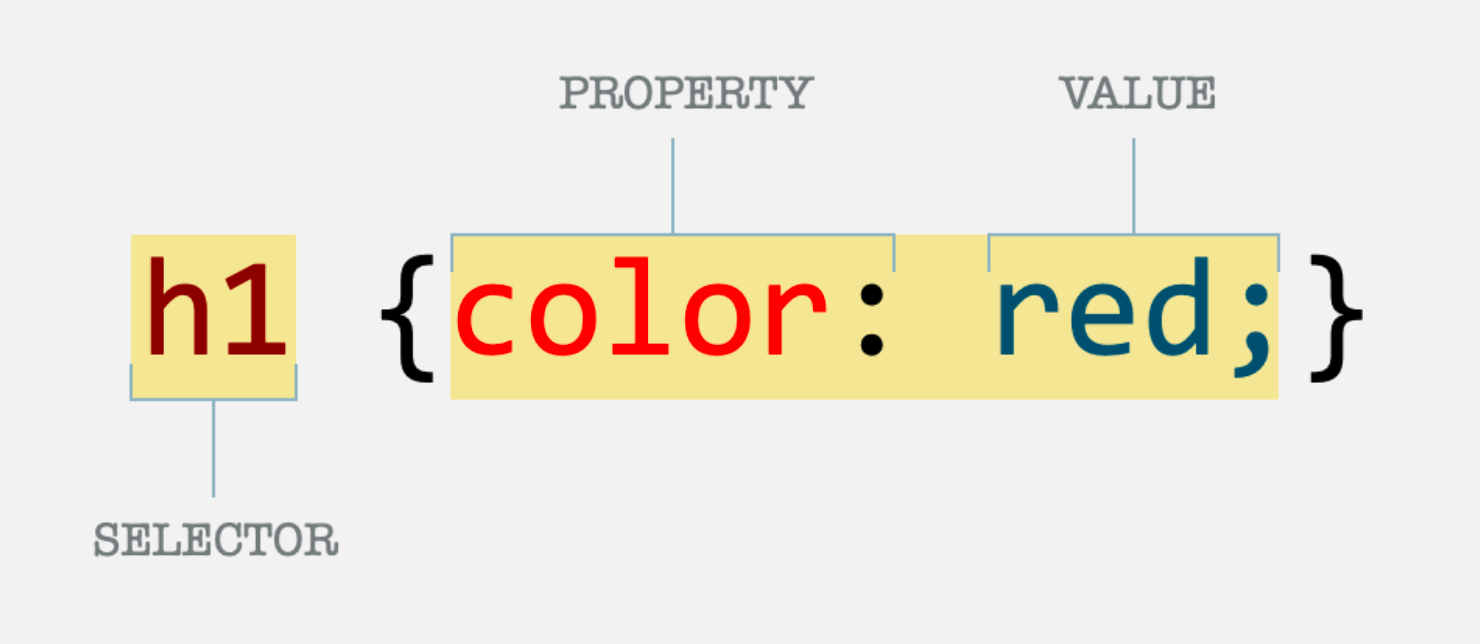
<h1>element that makes the text color red. If you do not see the<h1>element change to red, double-check your spelling in the<link>element.h1 {color: red;}We've briefly looked at the components of making a CSS rule in previous lectures. There are two main parts of a CSS rule.
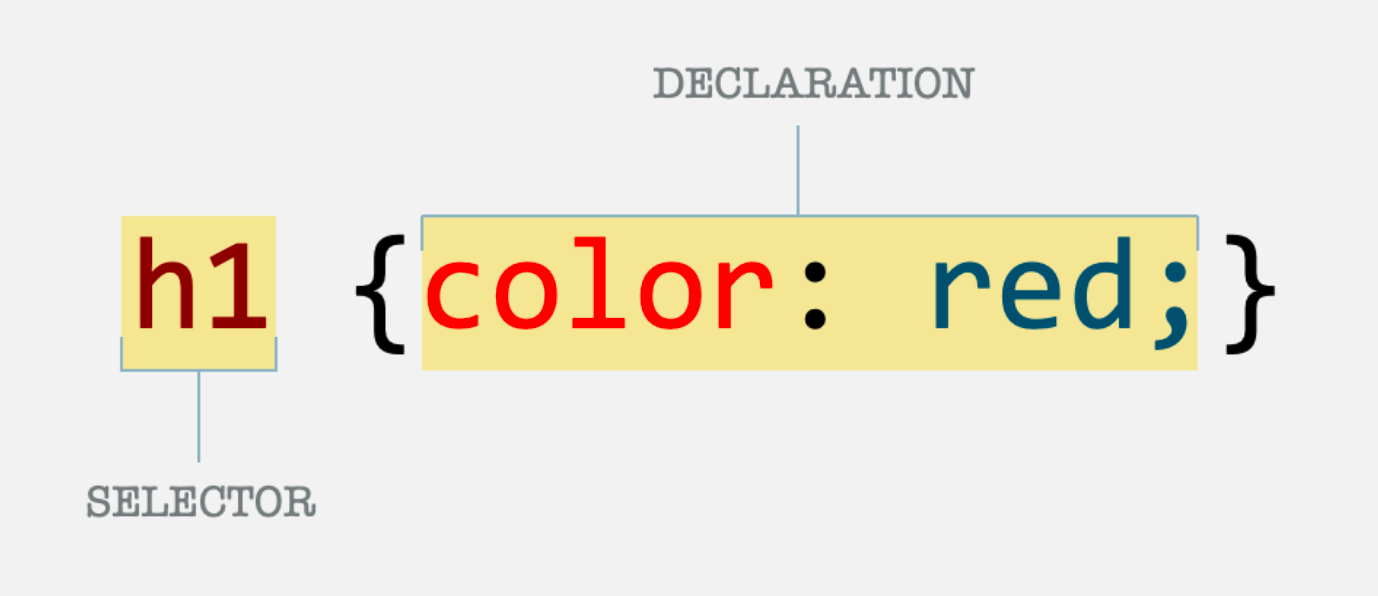
Selector
- A selector identifies the element or elements to be affected.
- There are different types of selectors. The
h1selector we used above is an element selector. - The element selector is the most basic type of selector since it simply names the element we want to style.
Declaration
- Declarations are made up of property and value pairs.
- Each declaration ends with a semicolon.
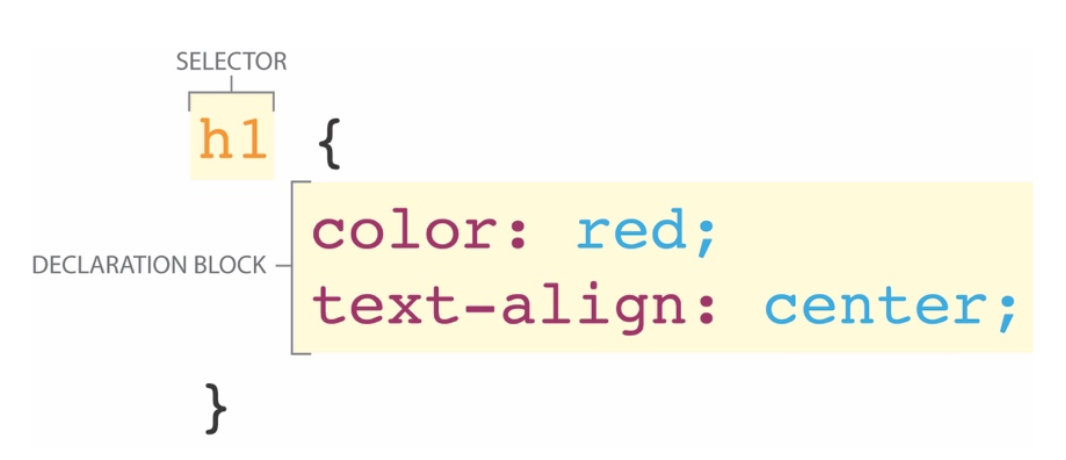
- One set of curly braces surrounds a declaration (or declaration block).
- The syntax is
property: value; - You can have more than one declaration. More than one declaration creates a declaration block.
-
Inside your declaration, the properties, and their values describe the styles you want to apply to the selector. Each pair is one CSS rule.
Properties & Values
- There are many different properties and value pairs that you can assign to HTML elements. There are too many to memorize, so don't worry about learning them all. You will become familiar with a good number of them over the semester.
-
Add a second rule to the
h1selector. Thetext-alignproperty will position text or images inside a block element. Here we are centering the text inside theh1block.h1 { color: red; text-align: center; }
CSS Indentation
The indentation used is an industry-standard that improve legibility. The spaces and line-breaks do not alter the CSS.
Inheritance
How CSS styles are applied to your HTML document can be a tricky subject and why our HTML structure is so important. The HTML document that we have been building has an implicit structure or hierarchy. We refer to this structure as the DOM or Document Object Model
Document Object Model (DOM)
If we were to look at the index.html file from our demo, we could build the structure in an upside-down tree.
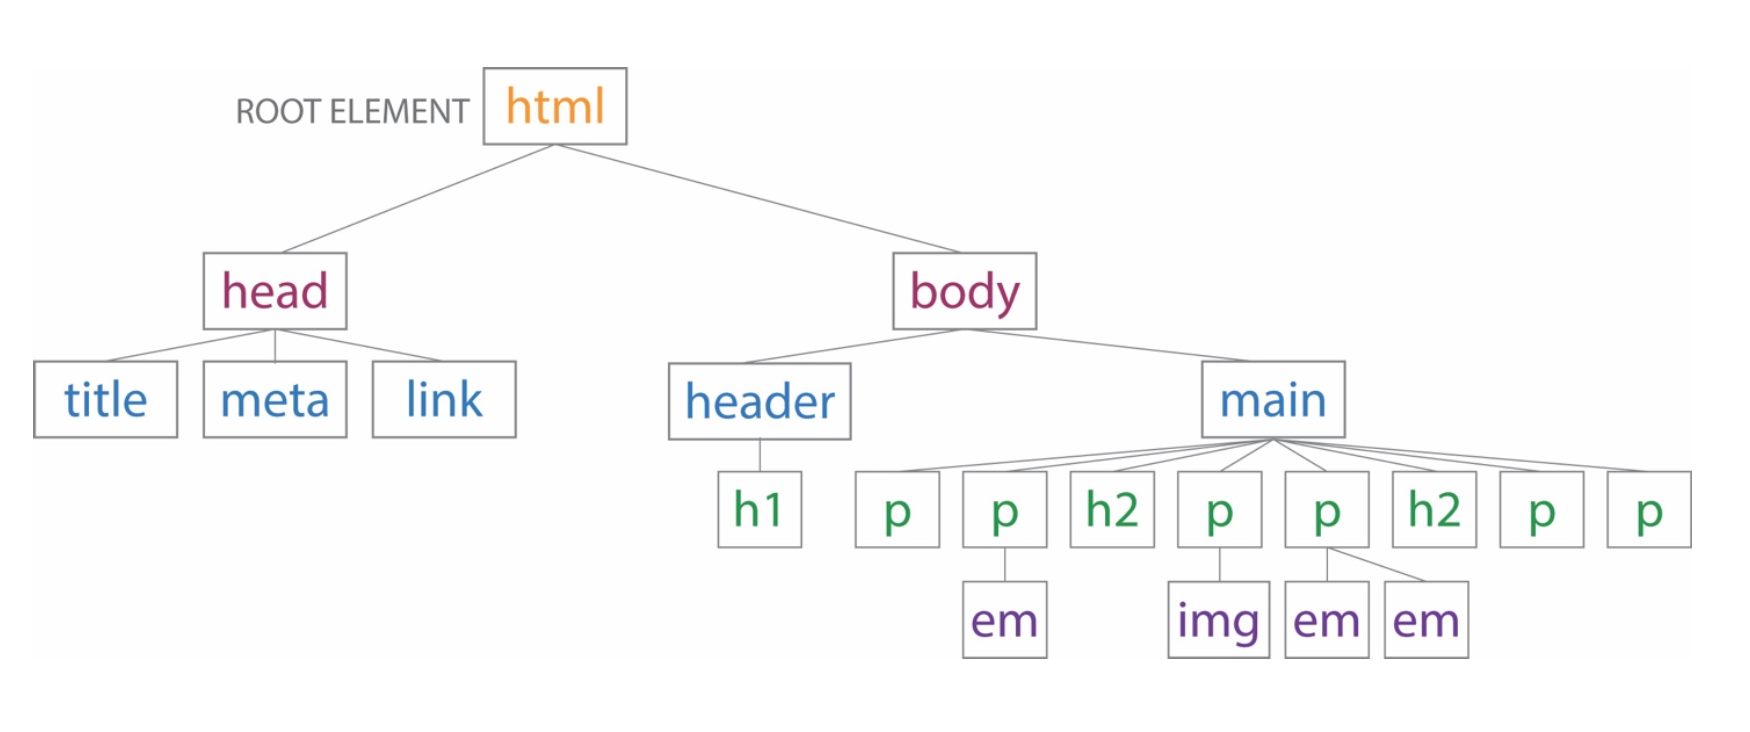
Descendants
All elements contained within a given element. The <h1>, <h2>, <p>, <em>, and <img> elements are all descendants of the body.
Child/Children
All elements directly contained within other elements. The <h1> is a child of the header element.
Ancestors
All elements higher than a particular element in the hierarchy. The body and html elements are the ancestors of the main element.
Parent
The element containing an element. The <p> element is the parents of the <img> element.
Siblings
Elements with the same parent. The two <em> elements that have the <p> parent are siblings.
Inheriting Styles
-
Add a new style to the paragraph element to make the font blue.
p {
    font-family: sans-serif;
    color: blue;
}
The above style also changed the color of the
<em>element text. The<em>elements inherited the styles from the parent<p>element.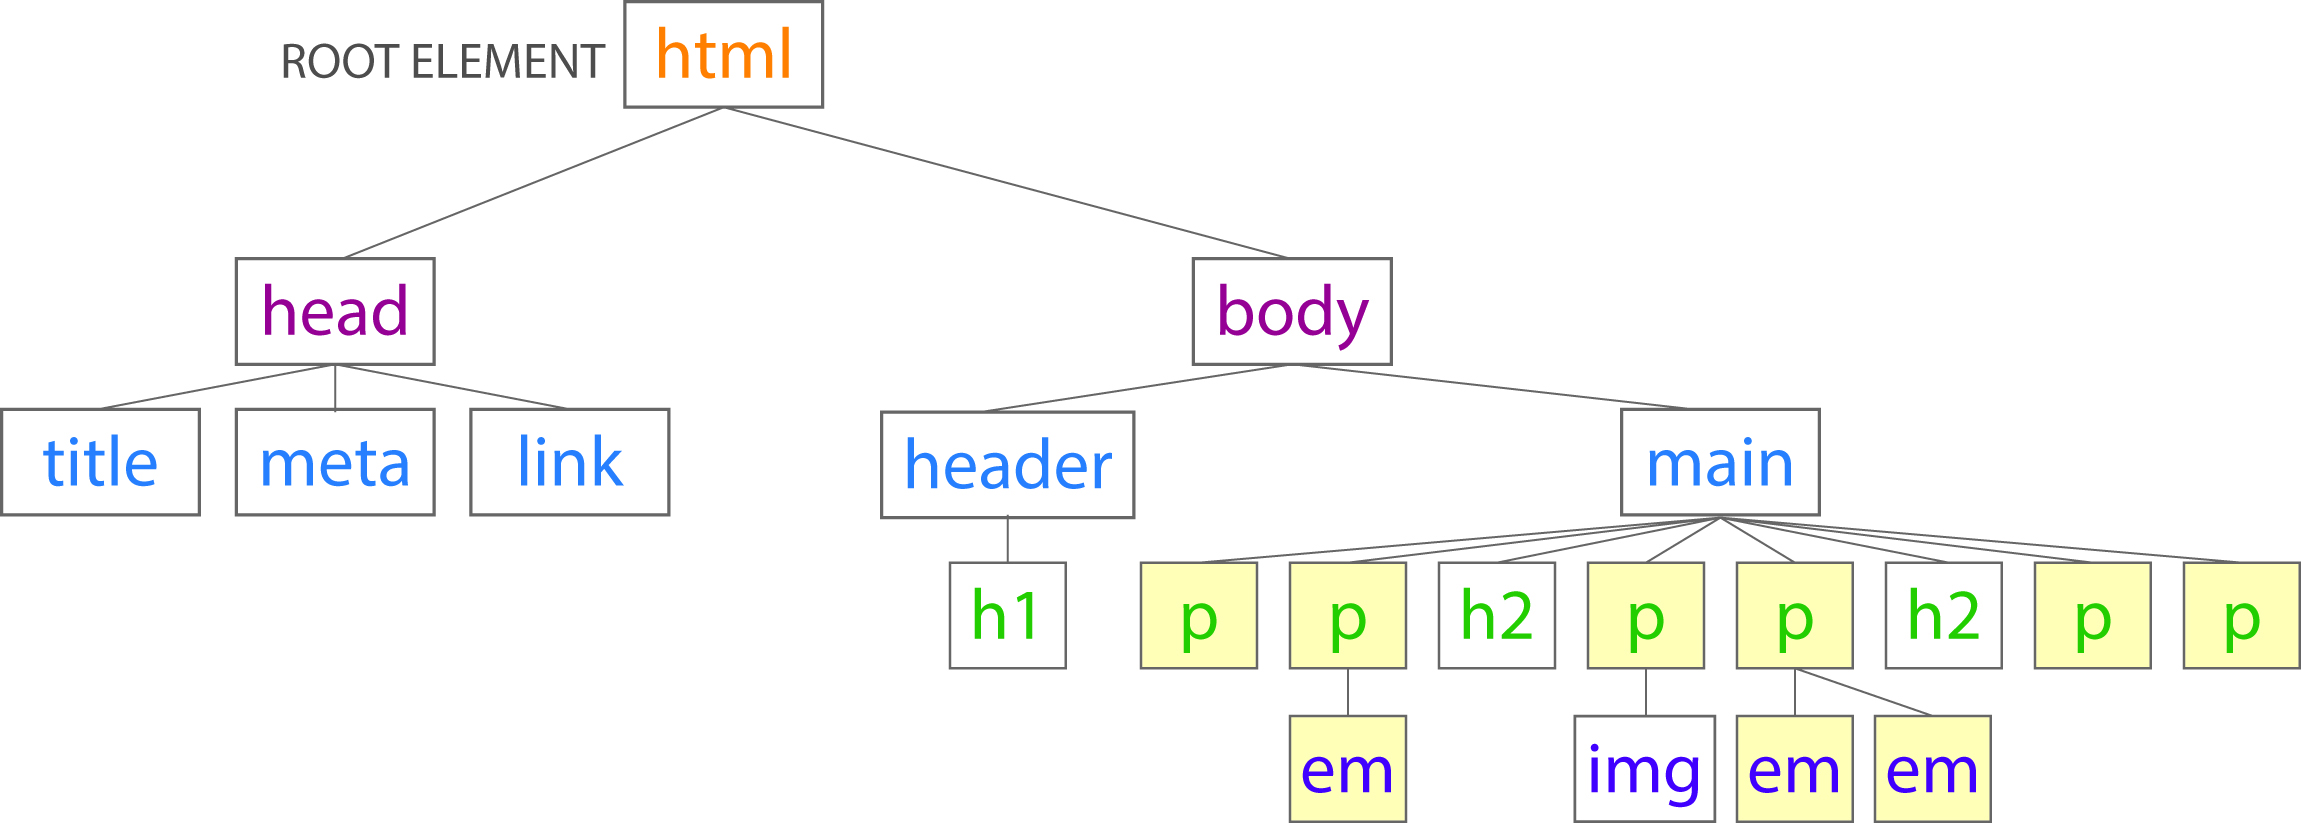
- Notice, that it did nothing to the
<img>element because font-related properties do not apply to images. - Not all properties inherit. Styles related to text do get passed down. However, styles like borders, backgrounds, and margins do not get passed down.
- Inheritance saves us time!
- Notice, that it did nothing to the
Conflicting Styles
This is where the "cascade" of Cascading Stylesheets comes into play. Cascade refers to what happens when several styles vie for control of an element. There are certain rules that the document follows to apply styles.
-
Open your developer tools and inspect the
<h2>element that reads "Too Many 20s'. Where is it getting its styles from?The "User Agent Stylesheet" is the default set of styles loaded by a browser. Therefore the
<h2>is automatically rendered larger and in bold.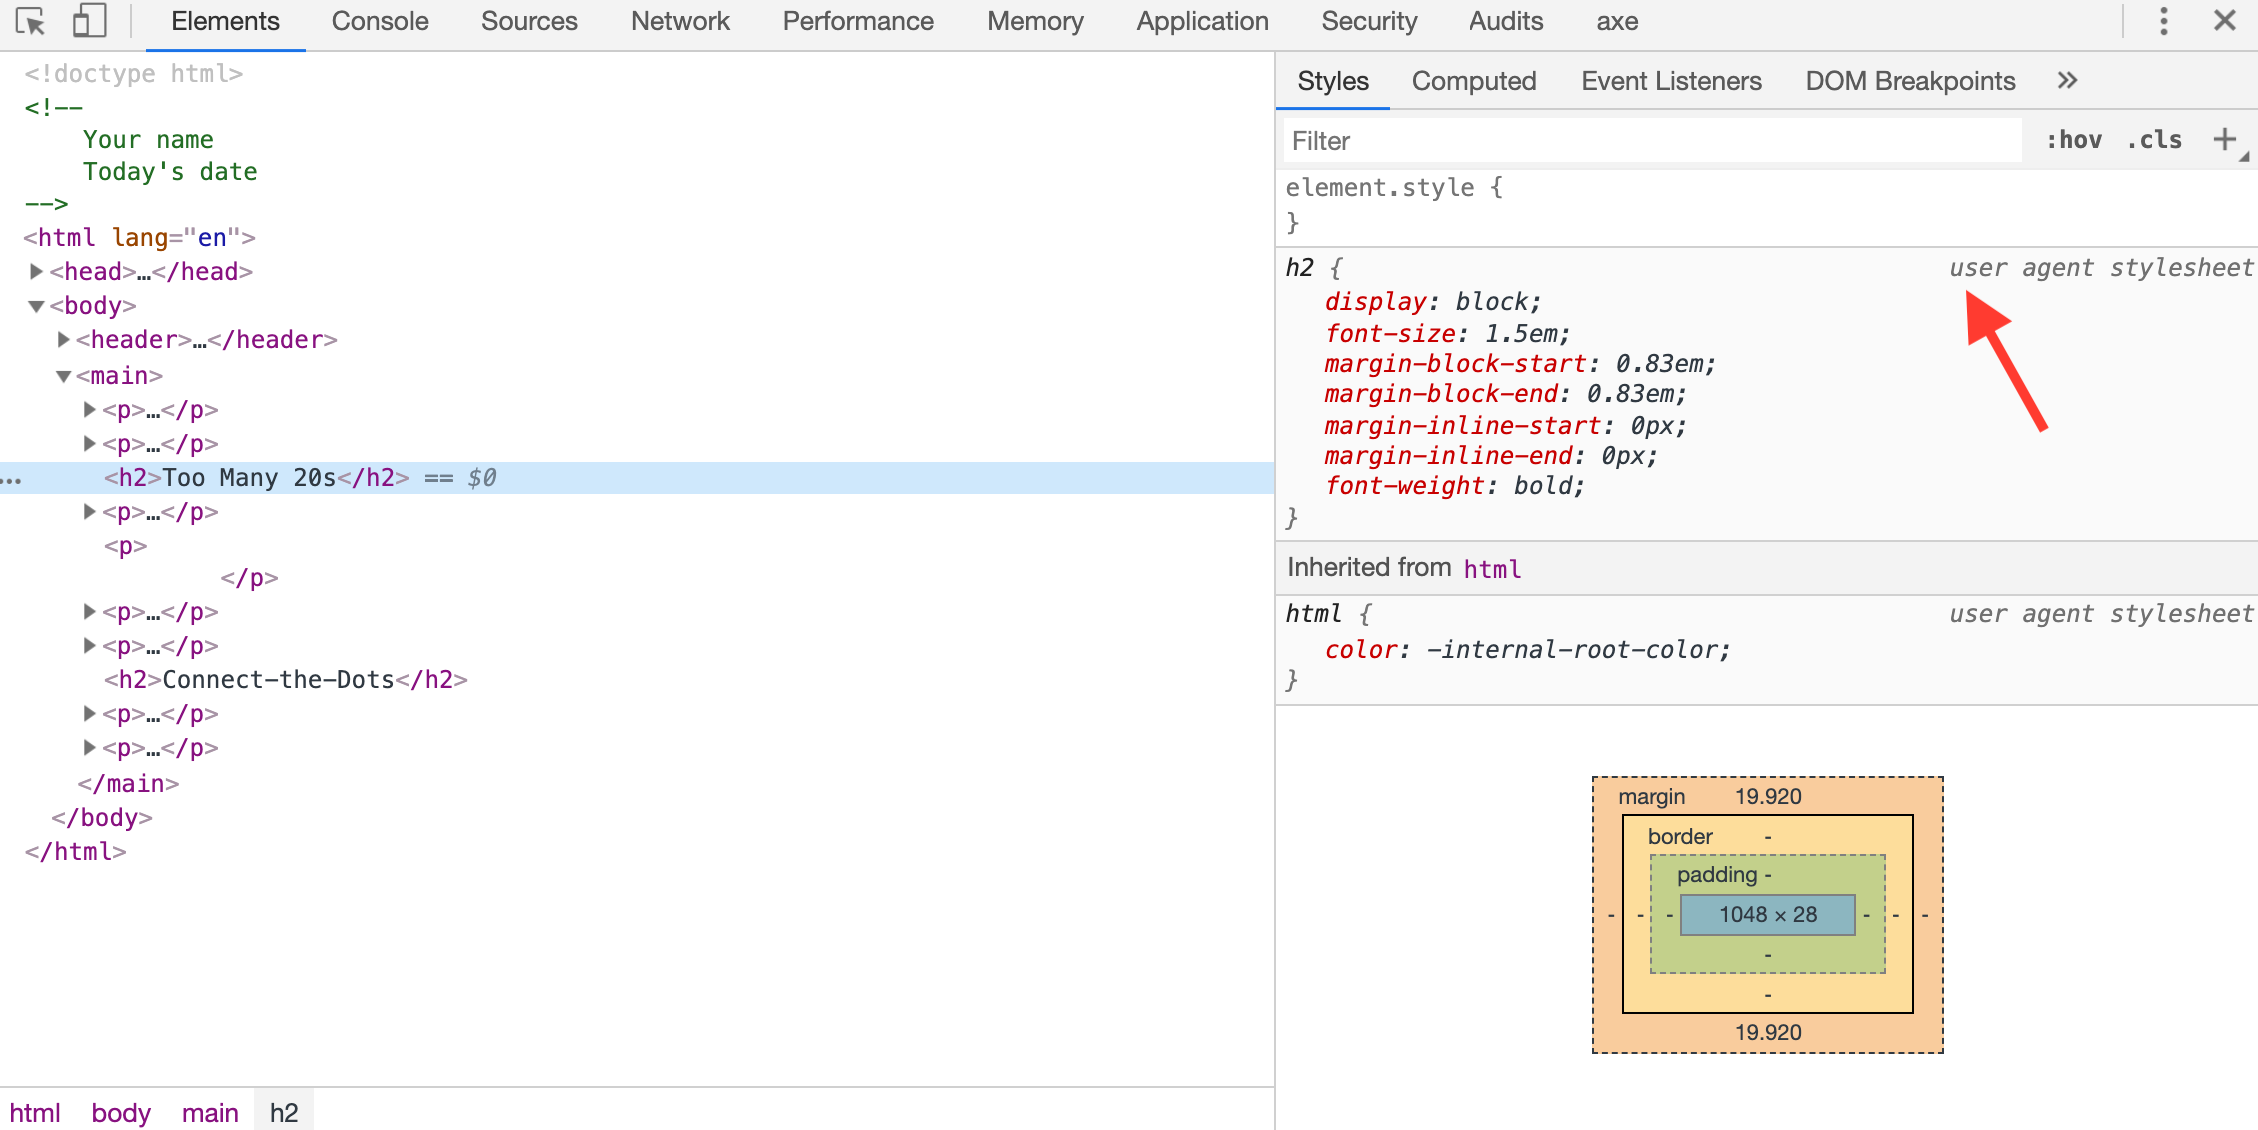
-
Create a style for the
<h2>element in our index.css stylesheet. This style conflicts with the User Agent Stylesheet, but our style "wins" and is the one that is applied.h2 { font-size: 40px; color: purple; } -
Create an embedded style for the same
<h2>element. Remember, this goes in our<head>element in the HTML document.<style> h2 {color: green;} </style>- Now, we have three styles applied to the same
<h2>element. The user agent stylesheet, the index.html stylesheet, and the embedded stylesheet. Which one wins? - The embedded stylesheet has more “weight” and is why we see the color change to green. The styles closer to the content will win out. What would happen if I gave the
<h2>element an inline style?
- Now, we have three styles applied to the same
-
We can force a rule to be applied by assigning importance with the
!importantindicator. In your index.css add the importance indicator as highlighted below.h2 { font-size: 40px; color: purple !important; }The color goes back to being purple. Typically, you don't want to use the
!importantindicator because it breaks the normal inheritance rules, and it can be difficult to debug in the future. Avoid using this. -
Delete the !important indicator and the embedded stylesheet you created since these are not the best practice to follow. The
<h2>should still be purple. -
Add a style for the
<em>element.em {color: magenta;}- Two styles are being applied to the
<em>elements. Remember that blue is being applied since it is being inherited through the parent element,<p>. However, because the<em>now has its own style that wins. This is called specificity. - When two styles in the same stylesheet conflict, the more specific selector style wins.
- Two styles are being applied to the
-
Add a new paragraph selector and style this green in the index.css stylesheet.
p {color: green;}- The paragraph has two color styles being applied. One that is blue and one that is green. Why does green win?
- When two styles have the same weight, the style that comes last on the style sheet will win.
CSS Hierarchy
In order:
- Browser default settings (User Agent Stylesheet)
- External stylesheet
- Embedded stylesheet
- Inline styles
- Styles with importance indicator
Conflicts in the same style sheet are resolved by:
- Specificity
- Rule order
The Box Model
The browser sees everything as being contained in a box.
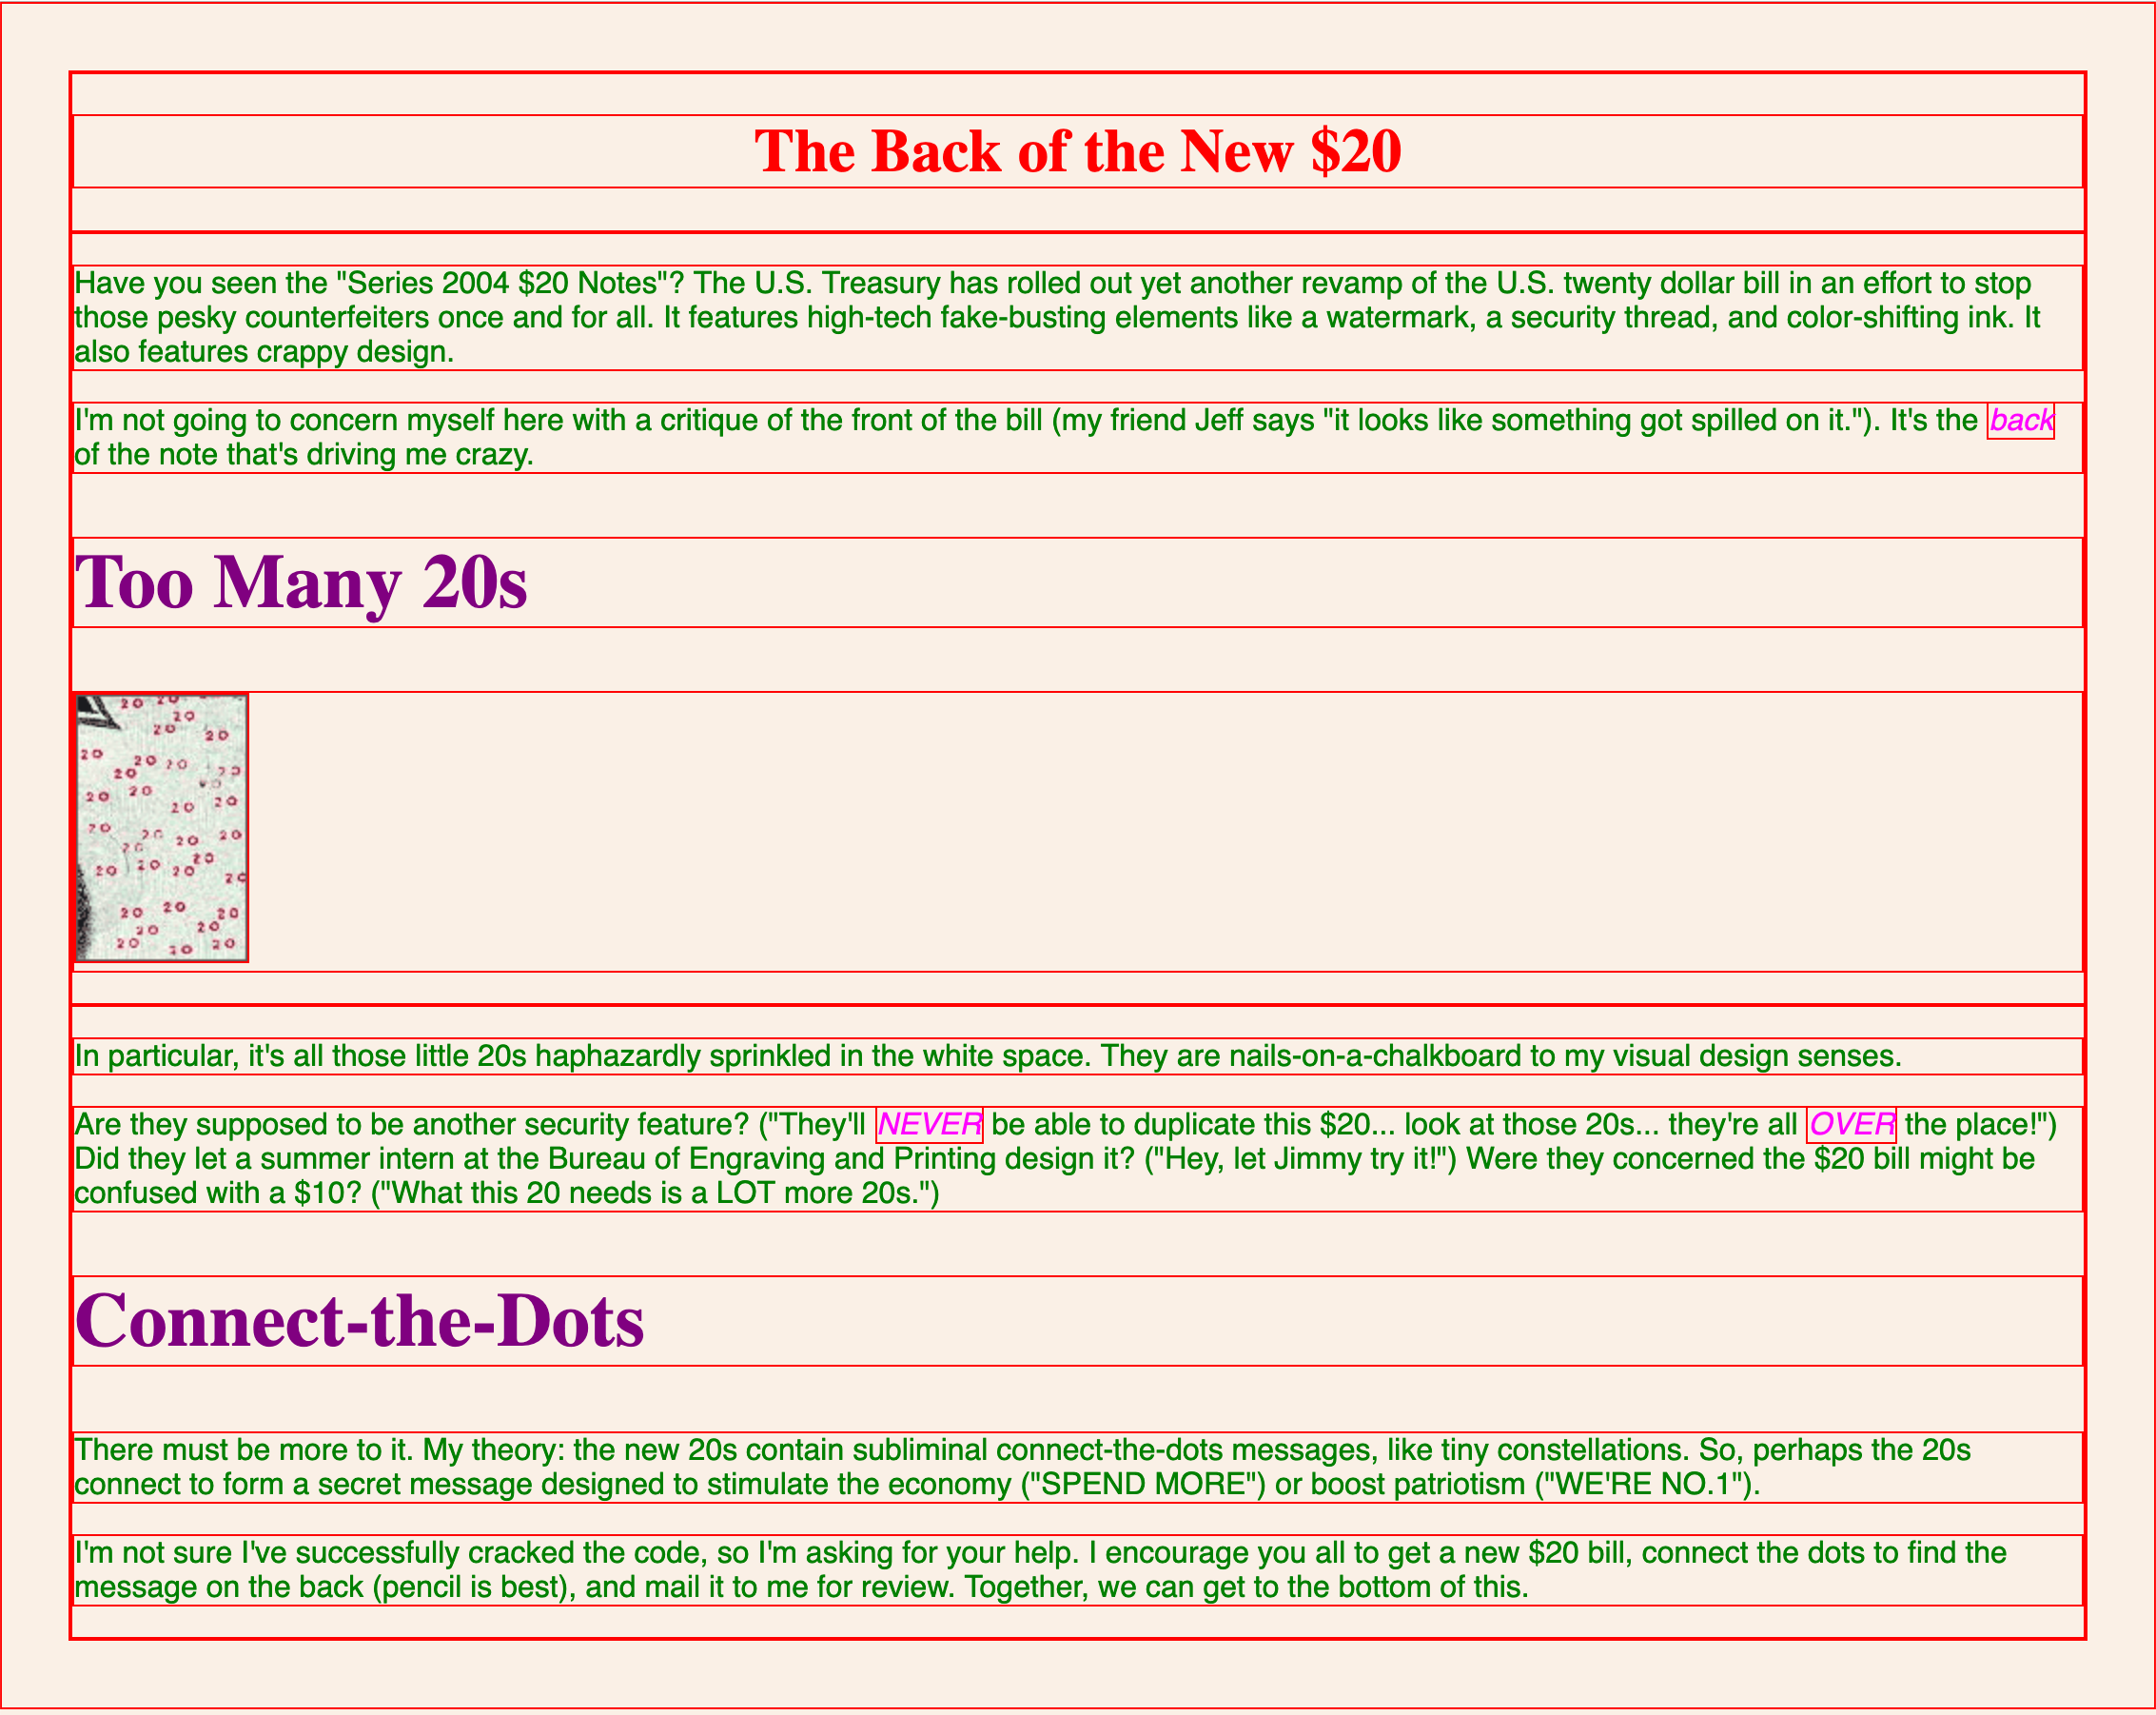
The next image shows our website with every element in a red border. Notice the block-level elements extend the entire width of the document, where inline elements like <em> and <img> just extend the width of their containing content.
You can target every element in the document by using the universal selector (*) and applying the below property/values.
* {border: 1px solid red;}
We’ll be coming back to this important topic later.
- Delete the red border style if you applied it yourself.
Grouping Selectors
If you need to style more than one element the same way, there is a shortcut!
-
Add the following styles to your index.css document.
- You can group selectors by separating them with a comma.
h1, h2, em {border: 1px solid blue;}- The border rule applies to all three elements.
- There is a shortcut property being used here. We specified the width, style, and color of the border all in one.