Week 4 Learn & Practice - HTML Text
Textbook
- Chapter 5: Marking Up Text
Element Review
Understanding the difference between block-level and inline elements is crucial before moving to our next module, CSS. Make sure you understand these key differences.
Block-Level Elements
- Renders content on a new line
- Renders content left-justified
- Renders content to expand the entire width of the document
- Meant to structure the main parts of your page by dividing up content
Inline Elements
- Sometimes called text-level elements
- Does not render content on a new line.
- Renders in the flow of text by default (only takes up the space of the content it surrounds).
- Inline elements are meant to differentiate parts of the content or to give it a particular function or meaning. Inline elements usually comprise a single or a few words.
Elements We've Seen
- Download week04Demo_organize_page_content.zip and open the website in VS Code and view the website with the Live Preview, then use the “Open in Browser” to show your webpage in your browser. I recommend getting comfortable using both.
-
Take a moment to review the HTML of index.html. You should recognize many of the elements.
Element Purpose <!DOCTYPE>Defines an HTML5 document <html>Defines the root of an HTML document <head>A container to hold data about the document, such as the title, character set, etc. <body>A container for the document content that appears in the web browser. <title>Defines the document title (appears in browser's tab) <meta>Defines the document's metadata (in this case, the character encoding) <h1>-<h6>Defines HTML headings <p>Defines a paragraph
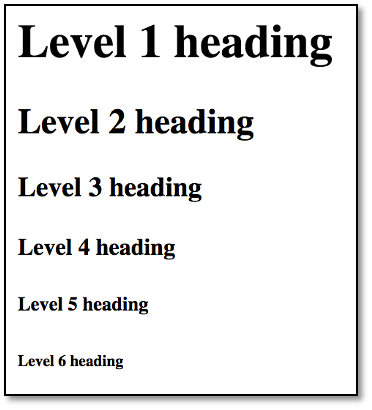
HTML Headings
Look at the header elements used in the index.html document
- Six header levels. Each level indicates the hierarchy of the page, like an outline.
- Headings are block-level elements, which automatically renders the content on a new line and adds spacing around the content. It also automatically expands the entire width of the page.
- Start with an
<h1>and work down in numerical order. Skipping a heading level is a violation of accessibility. - Every document should have one
<h1>element - Screen readers use page headings to scan and navigate the page.
- Search engines examine headings in their algorithms to determine site content. So, when used correctly, they can improve your Google search results.
- Do not use headings to size text. Changing the size of the text should be done with CSS (see Module 2)
Paragraph Elements
Look at the paragraph elements. We have already used a
element in our demos and exercises. It is the most rudimentary element of a text document.
- Paragraphs are a block-level element, so they appear on a new line and extend the entire width of the document window by default.
- They can contain inline elements, such as images, but they cannot contain any other block-level elements. This is a course standard.
- HTML validators will not flag a missing closing paragraph tag. So, it’s important for developers to be vigilant and ensure the closing tag is present for consistency and clarity. This is also a course standard.
Horizontal Rule Element
- This is an empty or self-closing element, as it does not contain any content.
- Often used to break up sections visually.
-
Better to use CSS to create a visual line
-
Add a horizontal rule
<hr>underneath the<h1>element.
<header>
   <h1 id="pageTitle">Web Browsers</h1>
   <hr>
Line Break Element
- Empty or self-closing element
-
Better to use CSS to create extra space or add HTML elements to insert breaks where needed.
-
Add two break elements
<br>after the<nav>element, but before the closing</header>tag.
<header>
   <h1 id="pageTitle">Web Browsers</h1>
   <hr>
   <p>Google Chrome, Firefox, and Internet Explorer are the most used browsers
   today.</p>
   <nav>
      <a href="#chrome">Chrome</a> |
      <a href="#explorer">Internet Explorer</a> |
      <a href="#firefox">Firefox</a>
   </nav>
   <br><br>
</header>
Preformatted Text
The <pre> element tells the browser to render any space or line breaks. If you remember from a previous lecture, the browser ignores whitespace, such as line returns and character spaces.
- Displays text exactly as it is typed (including tabs, spaces, line-returns)
- The default is to display content in a monospace font (consistent width)
Lists
There are three types of lists you can create in HTML.
- All lists are block-level elements
- Lists can be nested (children) or other lists
| Name | Element | Description |
|---|---|---|
| Unordered List | <ul> ... </ul> |
No pre-defined order |
| Ordered List | <ol> ... </ol> |
Has a pre-defined order |
| Description List | <dl> ... </dl> |
Name and value pairs |
Unordered Lists
- Under the paragraph about Google Chrome add an
<h3>heading element with the content, Advantages. -
Under the heading, create an unordered list element
<ul><article id="chrome"> <h2>Google Chrome</h2> <p>Google Chrome is a free, open-source web browser developed by Google, released in 2008.</p> <h3>Advantages</h3> <ul> </ul> </article> -
Next, add the list items in the unordered list. These are created with
<li>elements. Since each<li>element is a child of the<ul>it is indented 4 spaces.<article id="chrome"> <h2>Google Chrome</h2> <p>Google Chrome is a free, open-source web browser developed by Google, released in 2008.</p> <h3>Advantages</h3> <ul> <li>It loads and displays pages very quickly.</li> <li>You can have multiple tabs displaying different information.</li> <li>Google Chrome is easy to use.</li> </ul> </article>
Ordered List
- Under the Unordered List, create another
<h3>element with the content, “How to clear the cache.” - Beneath the heading create an ordered list.
- Add the following items to the list:
- On your Android phone or tablet, open the Chrome app
- At the top right, tap More
- Tap history, then clear browsing data
- At the top, choose a time range --> To delete everything, select all time
- Next to “Cookies and site data" and "Cached images and files," check the boxes
- Tap Clear data
Do you see a numbered list appear in your browser or preview pane?
Description Lists
The last list type we will cover is the description list. These list types are beneficial when used for key-value pairs. Key-value is a concept you will encounter quite often in programming. Essentially, it’s used to refer to a combination that needs to be together. Examples of key-value pairs you are already familiar with:
- Questions and answers
- Terms and definitions
-
State and their cities
-
Under the ordered list add one more
<h3>element with the content FAQ. -
Under the headings add a
<dl>element.<h3>Frequently Asked Questions</h3> <dl> </dl> -
Add a
<dt>as a child of the<dl>. Remember to indent properly! The content should read, “What are Google Chrome Extensions?” This is called the description term. -
Under the
<dt>add a<dd>. The content should read, “Google Chrome Extensions are applications that run inside the Chrome browser and provide additional functionality, integration with third party websites or services, and customized browsing experiences.” This is called the description definition.<h3>Frequently Asked Questions</h3> <dl> <dt>What are Google Chrome Extensions?</dt> <dd>Google Chrome Extensions are applications that run inside the Chrome browser and provide additional functionality, integration with third party websites or services, and customized browsing experiences.</dd> </dl>
Organizing Page Content
HTML5 introduced several semantic elements to help organize content on the page. Look at how the demo website uses some of the elements below to define areas of content.
| Element | Purpose |
|---|---|
<nav> |
Container for the navigation. Often the navigation contains an unordered list for the navigation items. |
<header> |
Container for introductory material like the logo, webpage title, and navigation. |
<footer> |
Container for the end content, can also be used at the end of articles, asides, headers, or nav elements. |
<main> |
Container for the primary content. Only one main element is allowed per webpage and cannot be a child of an article, aside, footer, header, or nav element. |
<aside> |
Container for complementary content. Often used as an “sidebar” to pull quotes, background information, or related links. |
<section> |
Defines a general content area. Used to divide up related content on the page. Often sections have headings associated with them. |
<article> |
Defines stand-alone content. Often used for magazine articles, blog posts, or comments. This element must have a heading element. |
Generic Elements
The <div> Element
- Like the
<section>element but has no semantic meaning. - The
<div>element is a block-level element - Indicates a division of content
-
No inherited presentational properties other than standard block-level characteristics
-
You should only use the
<div>element when no other block-level element makes sense. You want your HTML markup to be as meaningful as possible. The<div>element provides no semantic meaning to your HTML.<div> <h3>Div Usages</h3> <p>Although you can nest div elements within other div elements, avoid if possible.</p> <p>Add a div element only if it is necessary for logical structure, styling, or scripting.</p> </div>
The <span> Element
- The
<span>element is an inline element - Indicates a word or phrase for which no inline element current exists
-
No inherited presentation properties
<h3>Span Usages</h3>
<p>Instructor contact: <span>246.6701</span></p>
Why would I need this <span> element above? The answer lies in our next topic: id and class attributes.
Introducing Attributes!
The id Attributes
Sometimes we need to assign a unique identifier to an element. The key here is unique; an id value can only be used once.
-
Locate the three
idattributes being used in the demo webpage.- The
id="chrome"is uniquely identifying each<article> - The
idvaluechromemay only be used one time in this HTML document
<article id="chrome"> <article id="explorer"> <article id="firefox"> - The
What to know about the id attribute:
- An
idattribute cannot have an empty value, it must be at least one character - The
idvalue cannot contain spaces. This is a coding standard.
Using an id to create a link within the same document.
- We can use an
idto link to specific parts of our document. We haven't covered linking yet but look at the code in the<nav>element. -
The
<a>element is a link, and thehref="#chrome"is an attribute that tells the link to go to the article with theid="chrome"when clicked. When you see a#symbol, get used to automatically thinking of it as anid(the same way you may associate it to number, pound, or hashtag).<nav> <a href="#chrome">Chrome</a> | <a href="#explorer">Internet Explorer</a> | <a href="#firefox">Firefox</a> </nav>
Make an unique id.
-
Add the
id="pageTitle"to the opening<h1>tag at the top of the page. Remember, you can’t have spaces in anid.<h1 id="pageTitle">Web Browsers</h1>
The class Attribute
Unlike the id attribute, the class attribute value can be used as many times as needed. Remember the <span> example from before? Now we can classify this content as a telephone number.
<p>Instructor contact: <span class="tele">246.6701</span></p>
What if I had multiple phone numbers in my document? I can reuse the same class to target each of them.
<h3>Class Attributes</h3>
<p>Instructor contact: <span class="tele">246.6701</span></p>
<p>Dean contact: <span class="tele">246.2651</span></p>
<p>Associate Dean contact: <span class="tele">246.1254</span></p>
<p>Principal contact: <span class="tele">246.5477</span></p>
- A
classis a global attribute, meaning it can be applied to any element in the document. - A
classattribute cannot have an empty value, it must be at least one character - For this course, the
classvalue cannot contain spaces --> This is a coding standard
A class attribute can contain many values
If you need a class to contain muliple values they are delimited by a single space, which is why the name of your class cannot contain spaces. See example below:
<p>Super Duper Important contact: <span class="tele urgent large"></span>555-1234</p>
An element can have both an id and a class attribute
This becomes very useful when we get to CSS (the presentation). Since all the phone numbers are classified with the tele value it would be easy to style them all. For example, they could all be blue, or have a drop shadow. The same can be said with the id attribute. We can use the id to add styles to specific elements.
<p>Super Duper Important contact: <span id="manager" class="tele urgent large"></span>555-1234</p>