Demo - Selectors
Textbook
- Chapter 14: Selectors
Review
Let's review the selectors we have learned so far. Download the starter site demo-selectors.zip and open it in your browser and code editor.
Element selectors
An element selector targets all instances of a specific HTML element on the page. All paragraph elements will have blue text.
/* Example Element Selector*/

p {
  color: blue;
}
 In the demo-selectors website, style all the
 <h2> headings with at least 2 styles (example: color, font-size, text-transform). Add this style rule under the ELEMENT SELECTOR comment section of the CSS document.
ID Selectors
An ID selector targets a single element with a specific id attribute. IDs should be unique on a page. Only the element with id="header" will be styled with a lightgray background.
/* Example Id Selector */

#header {
  background-color: lightgray;
}
In the demo-selectors website, style the <header id="mainHeader"> header with at least 2 styles (example: background-color, text-alignment, font-family). Add this style rule under the ID SELECTOR comment section of the CSS document.
Class Selectors
A class selector targets all elements with a specific class attribute. Classes can be reused on multiple elements. All elements with class="standOut" will be bold.
/* Example Class Selector */

.standOut {
  font-weight: bold;
}
In the demo-selectors website, style the class="highlight"> elements with at least 2 styles (example: font-weight, background-color, color). Add this style rule under the CLASS SELECTOR comment section of the CSS document.
Descendant Selectors
A descendant selector targets elements that are nested inside another element (at any level). All <p> elements inside a <article> will be green.
/* Example Descendant Selector */

article p {
  color: green;
}
In the demo-selectors website, style only <p> elements inside the class="card" article with at least 2 styles (example: font-weight, background-color, color). Add this style rule under the DESCENDANT SELECTOR comment section of the CSS document.
Pseudo-class Selectors
Some elements have "states". For example, clicking on links changes their color. Some change color when your mouse hovers over them. The <a> element has different states, such as visited, hover, active, and focus. In CSS, we can style the different states. We do this with the pseudo-class selector.
Pseudo-class selectors are indicated by the colon : character and typically go immediately after the element name.
For example, a:hover is a pseudo-class targeting the hover state of an <a> element.
| pseudo-class | description |
|---|---|
:link |
Applies a style to unclicked (unvisited) link |
:visited |
Applies a style to visited links |
:focus |
Applies a style when the element is selected and ready for keyboard input (tab key) |
:hover |
Applies a style when the mouse pointer is over the element |
:active |
Applies a style when the element is in the process of being clicked or tapped |
Example of a hover pseudo-class
a:hover {color: orange;}
-
In the demo-selectors website, locate the PSEUDO-CLASS SELECTORS section, and immediately following the "Style nav links when unvisited" comment, add a style to remove the default underline that appears under the navigation links. We can do this with the
text-decoration: none;property/value pair. We can style unvisited links with or without using the Notice that this does NOT effect the link underneath the mountain image./* Descendant selector + Pseudo-class selector */ nav a:link {text-decoration: none;} -
Add styles under the "Style nav links when hovered" comment to style links in a hover state. Font color is a good style to change on the hover state.
/* Descendant selector + Pseudo-class selector */ nav a:hover {color: teal;} -
Add styles under the "Style nav links when visited" comment for visited links. Make the
colorsomething other than the default purple./* Descendant selector + Pseudo-class selector */ nav a:visited {color: orange;} -
Add styles for the hover state. Change the
colorand add atext-shadow./* Descendant selector + Pseudo-class selector */ nav a:hover { color: magenta; text-shadow: .1em .1em .2em grey; } -
Add styles under the "Style nav links when active AND in focus" comment for the active state and focus state. Change the
font-weightto bold and add a different color./* Grouped! Descendant selector + Pseudo-class selector */ nav a:active, nav a:focus { font-weight: bold; color: red; }
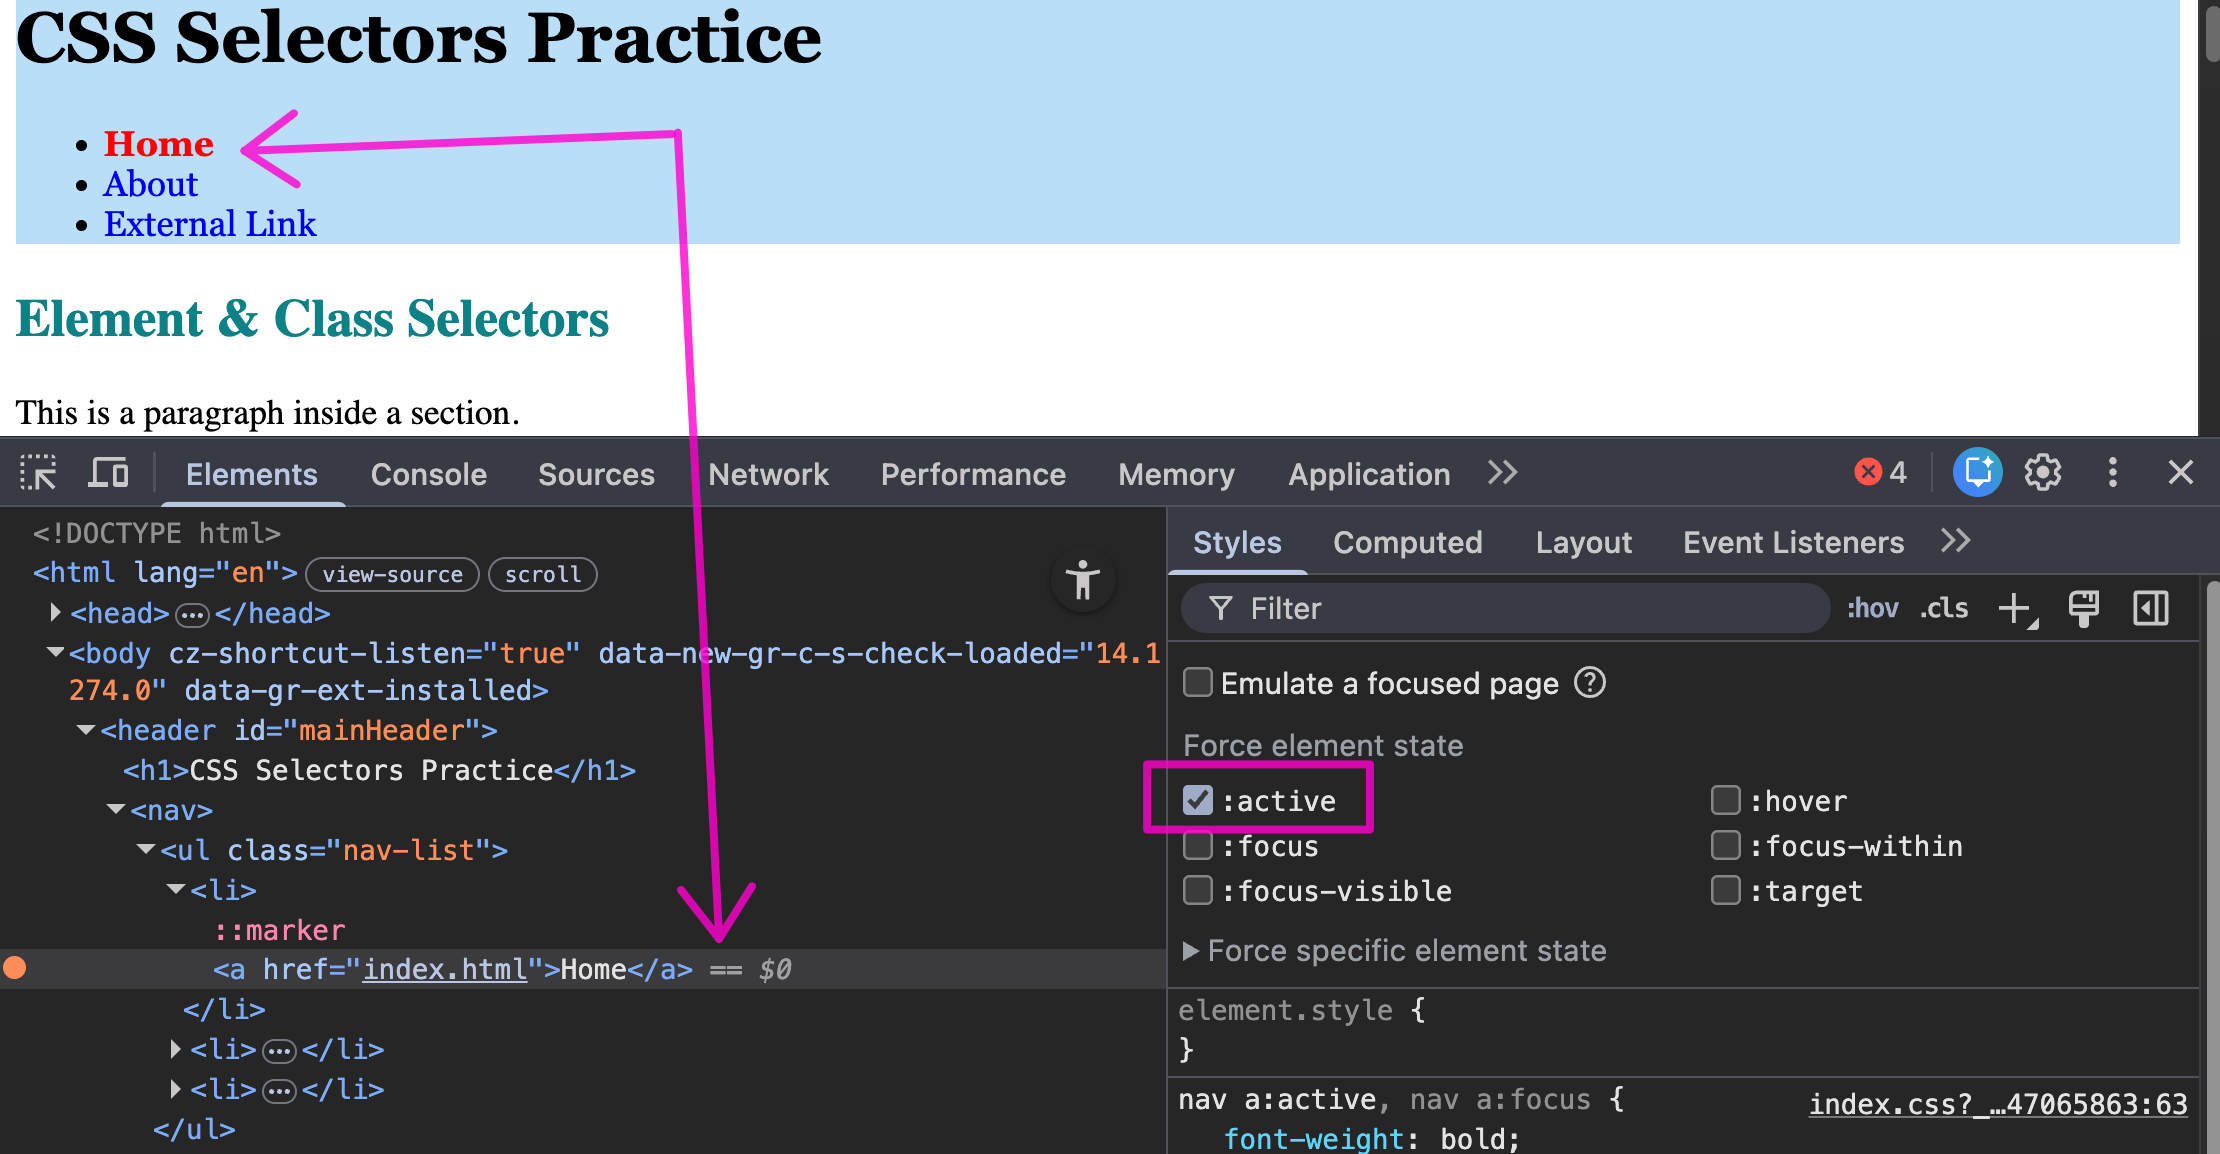
Viewing States in the Developer Tools
When you write CSS like a:link, a:visited, or a:hover, those styles only apply during specific states.
Sometimes you can’t easily trigger those states manually — especially :visited.
Chrome Developer Tools lets you force an element into a state so you can see exactly which CSS rules apply.
- Open Developer Tools
- Right-click on one of the navigation links you just styled.
- click on "Inspect"
- Make sure the element is highlighted in the Element tab.
-
Force a pseudo-state by clicking on the :hov button in the Styles panel (right side).
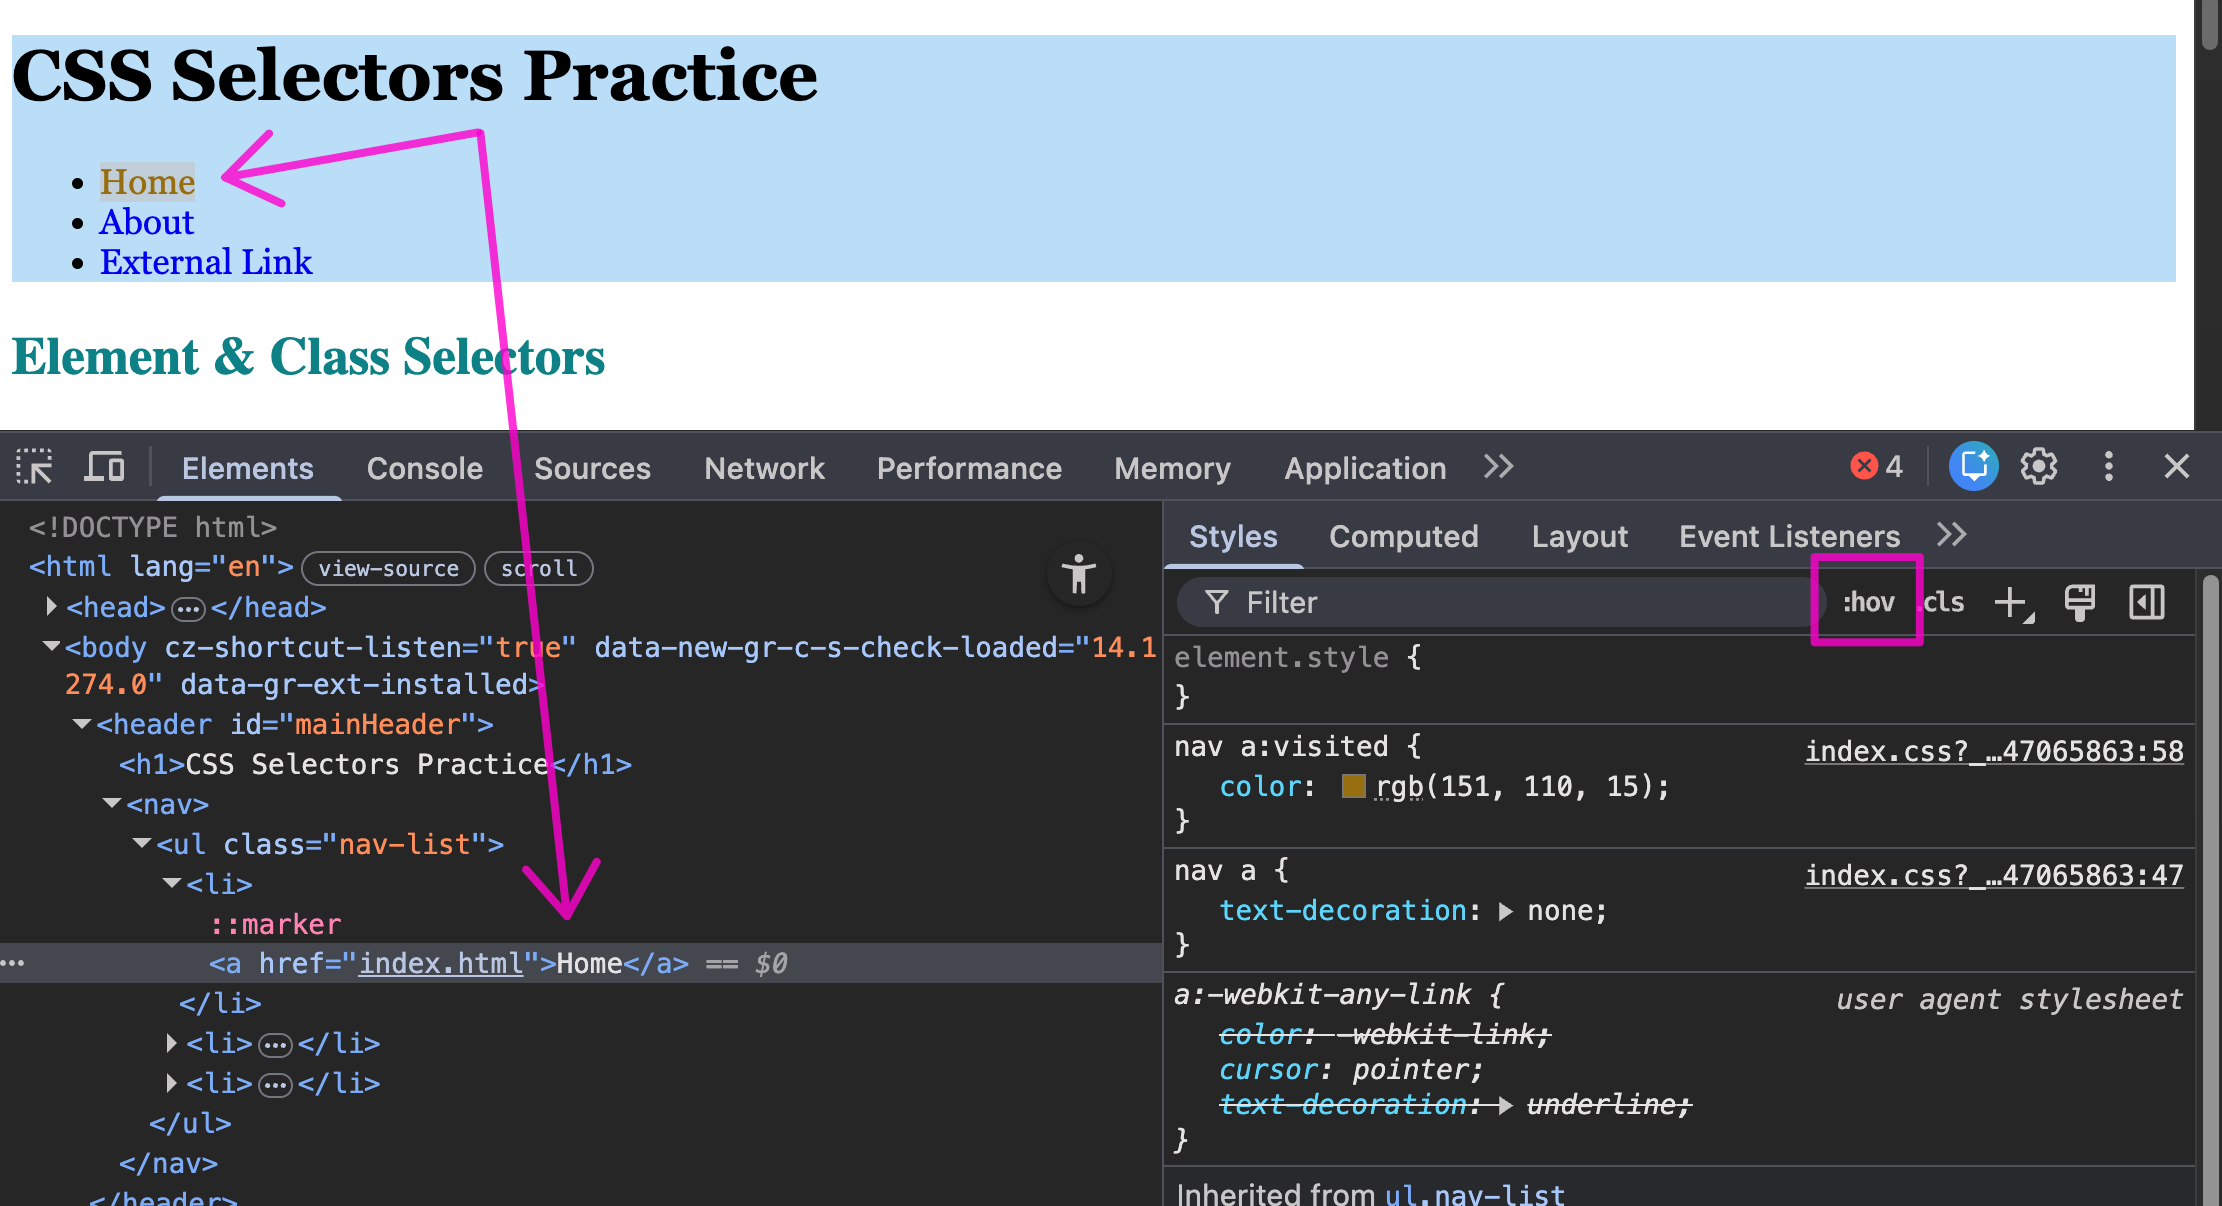
-
A menu will appear with checkboxes for :hover, :active, :focus, :visited. Click any one of them. Chrome will force that state, even if you are not interacting with the link.
Reset visited link color
Once you click on a link, the CSS visited color remains on that link. It may be helpful to reset these colors for testing purposes. To do this, you need to clear your browser cache. Here are instructions for clearing the browser cache in Chrome.
Other Pseudo-class Selectors
There are other pseudo-class that can be very helpful when styling your document. We don't have time to cover each pseudo-class here, but a list is available on page 339-347 of your textbook or some are viewable on W3Schools.
Let practice with a the first-child and nth-child() pseudo-class selectors.
-
Under the "Style the first li in .list" comment under PSEUDO-CLASS SELECTORS, style the first, and ONLY the first
<li>element in theclass="list"element so it is underlined./* Pseudo-class selector */ li:first-child { text-decoration: underline; } -
Under the "Style every even li in .list" comment, style the EVEN
<li>elements in theclass="list"in a different color./* Pseudo-class selector */ li:nth-child(even) { color: green; }
Pseudo-element Selectors
There are also selectors called pseudo-element selectors. They act as though they are inserting fictional elements into the document structure for styling. They are indicated in the stylesheet by two colons ::, you can also use a single colon :
| pseudo-element | description |
|---|---|
::first-line |
Applies a style to the first line of the specified element |
::first-letter |
Applies a style to the first letter of the specified element |
::after Inserts |
content after the specified element |
::before Inserts |
content before the specified element |
Note about ::first-line and ::first-letter
Certain properties are only available for ::first-line and ::first-letter. Page 280 of your textbooks list these.
-
Under the "Style the first letter of all paragraphs" comment under the PSEUDO_ELEMENT SELECTOR section, style the first letter of all
<p>elements to be larger./* Pseudo-element selector */ p::first-letter {font-size: 1.3em;}
Attribute Selectors
The attribute selector targets an element based on its attributes. Using an attribute selector can make your HTML markup cleaner because it removes the need to add a lot of id and class attributes. They are indicated in the stylesheet with the opening and closing brackets [ ]
-
Under the "Style links that start with https" comment under the ATTRIBUTE SELECTORS section, style links that start with
https/* Attribute selector */ [href^="https"] {color: purple;}We accomplished this by targeting the attribute,
hrefwith the beginning value,^=, ashttps.