Project 3: Coding Requirements
Terminal Commands for the Analyzer
- Use the command
$ ant build_analyzerto compile and build the class. - Use the command
$ ant run_tests_analyzerto test the class. - Use the script
$ ./runAnalyzer.sh YourFilePathto run the class.
Terminal Commands for the Web Application
- Use the command
$ ant tcupto start tomcat. - Web address: http://localhost:8080/java112/
Analyzer Tests
The Unit 3 tests includes three tests for the Challenges, which you can ignore if you not completing the challenges.
Project Overview
There are two parts to Project 3.
Part 1: Analyzer: Expand the Analyzer application with two more file analyzers.
Part 2: Web Application: Expand your web application by using JavaBeans, JavaServer Pages (JSP), Expression Language (EL), and the Model View Controller pattern (MVC)
Special note on project code
Projects must rely on coded solutions that have been covered in the class material, unless otherwise specified.
If the coded solution uses concepts not covered in class, you are required to do a code review. This review must include a detailed explanation of your coding choices and rationale for employing a solution beyond the scope of the class material.
Project Directory Structure
This structure will hold all projects for the course. Description of each directory:
    projects/
    |-- classes/
    |-- config/
    |-- dist
    |-- docs/
    |-- lib/
    |-- output/
    |-- public_html/
    |   |-- images/
    |-- src/
        |-- java112/
            |-- analyzer/
            |-- labs1/
            |-- labs2/
            |-- labs3/
            |-- project2/
            |-- project3/
            |-- utilities/
- The classes directory will hold all of your .class files in their correct package layout.
- The config directory will hold all of your project’s .properties files.
- The docs directory will contain the documentation for the application in javadoc format.
- The lib directory contains external jars that are required for the project
- The output directory will contain the output generated by your application. Your application will need to get the location of the output directory from the application properties file.
- The public_html directory will contain all the static files for your web application like .html files and all your JSP files.
- The images directory will contain all your web applications images.
- The src directory will contain all of your .java source code files in their correct package layout.
- The project1 directory will contain the source code that is only part of project 1.
- The project2 directory will contain the source code that is only part of project 2.
- The project3 directory will contain the source code that is only part of project 3.
- The utilities directory will contain the source code that is shared across applications. Web and Analyzer, for example.
Part 1: Analyzer
File Size
You must be prepared to test your application with a file that is bigger than 20MB with more than 4 million tokens (bigFile.txt). Your application must process this file properly.
Setup
- In your
build.xmluncomment the Project 3 line like this:
<!--  uncomment the line below for project 3  -->
<property name="project_3" value="present"/>
Token Lengths Analyzer
TokenLengthsAnalyzer Class Purpose
-
The purpose of the TokenLengthsAnalyzer class is to determine the length frequency of the tokens in an input file and display the frequency in an output file.
-
What does it know? for you to determine!
-
What does it do? for you to determine!
TokenLengthsAnalyzer Class Details
- Add a new analyzer class named TokenLengthsAnalyzer.
-
The class will have the following instance variables.
private Map<Integer, Integer> tokenLengths; private Properties properties; -
The class will have no set methods.
-
The class will have the following get method in addition to the standard ones for an Analyzer class.
public Map<Integer, Integer> getTokenLengths() { return tokenLengths; }- The length of each token will be the key of the Map.
- The value of the Map will hold the number of tokens with the key’s length.
TokenLengthsAnalyzer Properties Entry
- Add the below entry to the
analyzer.propertiesfile. - The value is the name of the output file for this class.
output.file.token.lengths=token_lengths.txt
Output
- The output will display two columns.
- The first column will list the token lengths in the file.
- The second column will list the corresponding number of tokens that are that length.
- Don’t display a length of zero (0).
- Don't add any headings to the file.
Here’s an example of a large file:
- There are 218539 tokens in the file with a character length of 1
- There are 811073 tokens in the file with a character length of 2, etc.
1   218539
2   811073
3   1093318
4   860621
5   496887
6   331115
7   262741
8   163533
9   109786
10  63961
11  30411
12  15283
13  7369
14  2729
15  870
16  210
17  107
18  25
19  5
20  2
24  2
27  1
Token Search Analyzer
TokenLocationSearchAnalyzer Class Purpose
-
The purpose of the TokenLocationSearchAnalyzer class is to determine where search tokens are located in the input file. For example, suppose that my sample file contains "Pong is one of our best tech leads." Here, the token "is" is located at position 2.
-
What does it know? for you to determine!
-
What does it do? for you to determine!
TokenLocationSearchAnalyzer Class Details
- Add a new analyzer class named TokenLocationSearchAnalyzer.
-
The class will have the following instance variables.
private Map<String, List<Integer>> foundLocations; private Properties properties; private int currentTokenLocation; -
The class will have no set methods.
-
The class will have the following get method in addition to the standard ones for an Analyzer class.
public Map<String, List<Integer>> getFoundLocations() {
    return foundLocations;
}
Search File
The list of tokens to search for will be read from a separate file.
- Add a new file,
search-tokens.txt, in theconfigdirectory. This file will contain the tokens to search for in the input file. -
Add some search tokens to this file. You can search for anything you want, for example:
the transparent magic lilac persimmon from Katsuragi -
Notice the empty line in the example above; your code must filter for empty lines. Therefore, I recommend having one in there to test against.
- The above search tokens file is not sorted. However, the output file must be sort by the search tokens.
- When testing this class, create an input file that does not have all tokens in the
search-tokens.txtto test against not finding a token. -
Create a new entry for this file in your
analyzer.propertiesfile. Don't forget the forward slash beforesearch-tokens.txtclasspath.search.tokens=/search-tokens.txt
How the search-tokens.txt file is used.
- It will be read by the analyzer before processing of the input file starts.
- It will be read in through the property
classpath.search.tokens - It must be loaded from the classpath, not a file system path. To learn more about reading a file from the classpath, please start with this resource.
- The analyzer must parse the
search-tokens.txtfile and store all search tokens in a Map. - The map will use each search token as the key to an element
- The map will use an empty ArrayList of Integers as the element’s value.
Basic Flow
- For each token in the input file, this analyzer will check to see if the token is one of the search tokens that were preloaded in the Map.
- The search is case sensitive.
- If the token is located, then the number position of the token in the input file will be added to the List associated with the search token in the Map.
- If the token is not located then no processing will take place.
Output
-
Add an entry in the
analyzer.propertiesfor the output file.output.file.token.search.locations=token_locations.txt -
The report that this analyzer generates will be a listing of all the search tokens and their locations in the input file.
-
The
token_locations.txtfile will consist of a listing of the search tokens and where each search token occurs in the file.- The output should follow the below format.
-
Found token, space, equal sign, [start new line], found location separated by a comma and space.
lilac =
6, 24

magic =

the =
2, 16, 20, 27, 30, 34, 54, 61, 80
-
The last location does NOT have a comma after it.
- You must keep the output file readable and manageable by not exceeding 80 columns.
- If a token is not located, the token should print without location (like the
magictoken above). - Blank search tokens are not allowed.
- You project must filter for empty lines in the
search-tokens.txtfile. - The output must sort by the search tokens, meaning if they are not alphabetical in the
search-tokens.txtfile, they should be in thetoken_locations.txtfile.
Show Ruler in VSCode (optional)
You may find it helpful to have a vertical ruler in VS Code to show where the 80 character limit is.
- Go to Settings and search for
rulerin the search bar. -
Click on Edit in settings.json under the Editor:Rulers

-
Type 80 for the
editor.rulerslimit.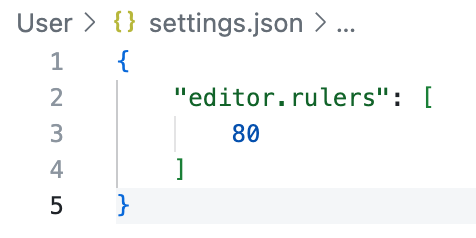
Output Help
If you find yourself stuck on the output portion of this project, try these smaller coding challenges. They will help you think through the process. An easy way to work on these is to copy the code into an online Java compiler/editor like this: Tutorialspoint Online Java Complier
Calculate Execution Time
Research and implement code to measure the time (in seconds) it takes for the ENTIRE analyzer application to run. This code will need to be in your Driver class.
-
Implement code to calculate the execution time of the analyzer application in seconds.
-
Display the calculated execution time on the command line in seconds after the application has completed all of its processing.
-
Important: Ensure that the analyzer application takes under 15 seconds to execute when searching for
if,and,for,thetokens against the BigFile.- If your application takes longer than 15 seconds to execute, refactor your search code to improve its efficiency and meet this time constraint. The ability to optimize code for efficient execution is a valuable skill in software development!
Analyzer Tests
The Unit 3 tests include tests for the Challenges, which you can ignore if you not completing the challenges.
Part 2: Web Application(s)
HTTP Request Application
This Java web application will use the MVC pattern to get and display information about the current HTTP Request.
- A JavaBean (Model)
- A JSP page (View)
- A servlet (Controller)
The JavaBean (Model)
The JavaBean for this web application will have instance variables for HTTP Request Parameters.
- Create a JavaBean class named
HttpRequestData. - This class will be part of the
java112.project3package. -
Create instance variable for the following:
- The remote computer making the request
- The address of the remote computer making the request
- The HTTP method of the request
- The request URI
- The request URL
- The protocol of the request
- The server name
- The server port number
- The current Locale of the server
- The query string
- The value of a query parameter with the name of “queryParameter”
- The value of the request header with the name of “User-Agent”
The Servlet (Controller)
The servlet will get the HTTP Request and store it in the JavaBean. Then, the JavaBean object will be saved to the request instance, and the control will be forwarded to the JSP page.
- Create a servlet named,
HttpRequestServlet. - The servlet will be part of the
java112.project3package. -
Change the @WebServlet annotation and give the servlet a name and URL. Something like this, but you can name it anything you’d like.
@WebServlet( name = "requestServlet", urlPatterns = { "/request-servlet" } ) -
In the
doGet()method, instantiate an instance of the HttpRequestData class (the JavaBean). - Assign all properties of the HttpRequestData object with information from the request object.
- Add the HttpRequestData instance to the request instance as an attribute.
- Forward to the HTTP Request Data JSP page specified below.
- Add a link to this servlet to the
index.jsppage. Link to the servlet, NOT to the JSP page.
The JSP Page (View)
The JSP page will display the HTTP Request data using Expression Language (EL).
- Create a JSP page named
httpRequestData.jsp, and save it to yourpublic_htmldirectory. - The page must use the same design as your site’s
index.jsppage.- The header and menu items must be the same as the index.jsp page.
- Create an unordered list in the content area of the page.
- Create a list item for each property in the JavaBean.
- Using the Expression Language (EL), display all the values in the JavaBean in the page.
Properties Application
This Java web application will use the MVC pattern to get and display Project 3 Properties.
- A Properties File (Model)
- A JSP page (View)
- A servlet (Controller)
Properties File (Model)
- Create a file named
project3.propertiesand place it into theprojects/configdirectory. This file will contain entries for the following:- The name of the author of the project
- The email address of the author
- The course title
- The course format (online/online-live/in-person)
- The name of your instructor
- A multi-line description of the project
The Servlet (Controller)
- Create a servlet named
PropertiesServlet; it will be part of thejava112.project3package. -
Change the @WebServlet annotation and give the servlet a name and URL. Something like this, but you can name it anything you’d like.
@WebServlet( name = "project3PropertiesServlet", urlPatterns = { "/project3-properties" } ) -
The servlet should have one instance variable for a Properties object.
- Add the
loadProperties()method to the servlet. - Add an
init()method to the servlet that calls the loadProperties() method. - In the
doGet()method, add the properties reference to the request object as an attribute. - Forward to the Properties JSP page specified below.
- Add a link to this servlet to the index.jsp page. Link to the servlet, NOT to the JSP page.
The JSP page (View)
- Create a JSP page named
project3Properties.jspand save it into yourpublic_htmldirectory. - The page must use the same design as your site’s
index.jsppage.- The header and menu items must be the same as the
index.jsppage.
- The header and menu items must be the same as the
- Create an HTML table with two columns in the content area of the page.
- Using the Expression Language (EL), display all the properties from the
project3.propertiesfile.- The property is the first column of the table. This can be hard-coded. We'll learn in the next unit how to make this a bit more elegant using a loop
- The value of the property is the second column Unlike