Project 1: Plan
How do you start work on a large programming project? It can feel like a daunting task, but with careful planning and time-management the process is more manageable.
Objective
This assignment helps you plan and prepare for Project 1 by:
- Fully understand the project requirements
- Review and analyze the class diagram
- Write pseudocode for each method in the FileAnalysis class
- Gather and submit all deliverables via GitHub
Read Before You Begin
You must complete this plan before writing any code. If it’s clear that coding started before your plan was finished, you risk not getting credit for this assignment.
-
The purpose of this assignment is to develop your logic and tests before you start coding. This step is critical to your success on the project.
-
You must earn a “MET” on your plan before moving on to the coding portion.
-
If you start coding first and then go back to “retrofit” your plan, you risk not receiving credit for this assignment.
-
When I review your plan, if it’s clear that you’ve already written code before completing it, your plan may be marked Not Yet.
-
Think of this plan as your blueprint—it’s meant to guide your coding, not document what you’ve already built. Taking time now to map out your logic and test cases will save you time and frustration later.
Take Your Time!
Give yourself time to let your brain process everything. It won't all make sense immediately; give yourself time to "chew" on all the information.
If you have any questions about the requirements, please post your question in the Ask Anything! Teams channel so everyone can benefit.
Step 1: Review Project Requirements
Take time to understand what the project asks you to build.
- Set aside 2–3 days for this step. Do not rush.
- Reread the Project 1 Requirements multiple times—you’ll catch new details each time.
- First read: get the big picture.
- Second read: focus on details.
- Third read: check for anything you missed.
- Take notes as you read.
- Watch the Project 1 Overview Video
- Ask questions in the Teams Ask Anything! channel if anything feels unclear.
Step 2 - Examine the Class Diagram
A class diagram is a visual representation of the different classes of a program and how they work together. Each class (represented below in blue) contains three key components: the class name, instance variables, and methods.
Learn more about Class Diagrams, their notation, and purpose.
- Prefixing an instance variable or method with a plus (+) sign indicates it is public.
- Prefixing an instance variable or method with a minus (-) sign indicates it is private.
- An instance variable is followed by a semicolon and the data type.
- A method indicates its parameters in parenthesis, followed by a semicolon and the return type.
Starter Class Diagram for Project 1 - FigJam - A copy of this class diagram has been provided for you as a FigJam.
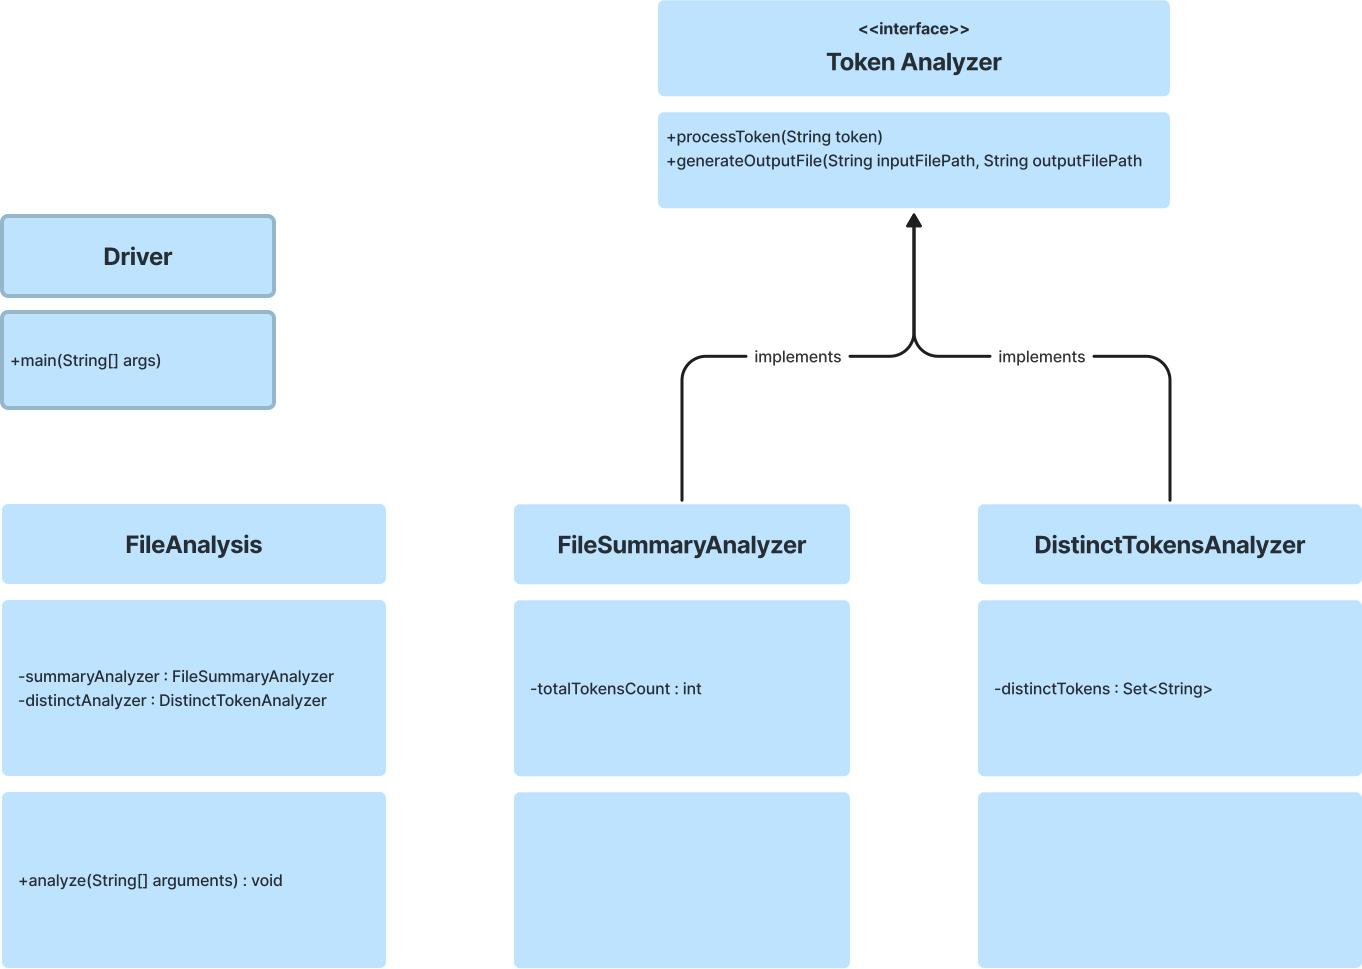
Step 3 - Complete the Class Diagram
Identify Instance Variables & Methods
Based on the project requirements, what other instance variables and methods do you think the program will need? Recall that to follow Java best practices each method should only be responsible for one task.
-
Add any missing instance variables and methods to the class diagram in the FigJam file. If you don't want to use FigJam, you are also free to create your class diagram in another tool, or with paper and pencil.
-
Save a screenshot of the class diagram in the
projects/screenshots/project-1/plandirectory asplan-classDiagram.png. You will need to create theplandirectory.
What is pseudocode?
Pseudocode is a way of describing your program's logic in plain English before you write any actual code. It's not a programming language — there are no rules about syntax, and it won't compile or run anywhere. That's the point.
When you write pseudocode, you're answering the question: "What does this method need to do, step by step?" You're not worrying about semicolons, variable types, or which Java classes to import. You're just mapping out the logic before you start building.
Why is pseudocode useful?
Pseudocode helps you:
- Catch gaps in your understanding before you get stuck mid-implementation
- Break a complex method into smaller, manageable steps
- Communicate your design so your instructor can give you early feedback
- Start coding with confidence because you've already thought through the logic
What does pseudocode look like?
There's no single correct format. Some people write numbered steps; others write short paragraphs or use indentation to show structure. As long as your pseudocode clearly describes the logic of each method, it's doing its job.
Here's an example — a method that opens a text file and processes its contents. This is similar in spirit to what your FileAnalysis methods will need to do:
METHOD processFile(filePath):
    Open the file at the given file path
    If the file cannot be found, display an error message and stop

    Create an empty collection to hold the results

    For each line in the file:
        Split the line into individual words
        For each word:
            Remove any punctuation from the word
            Convert the word to lowercase
            If the word is not empty, add it to the collection

    Close the file
    Return the collection
END METHOD
Notice what's not in this example: no BufferedReader, no try-catch, no type declarations. Just the steps, in plain English, in the order they happen.
Your pseudocode for FileAnalysis should follow this same spirit — describe what each method is supposed to do, in the order it does it, in your own words.
You don't need to get it perfect.
Pseudocode has no required format and won't be graded on grammar or precise structure — only on whether it shows your logical thinking. Writing something rough is always better than leaving it blank. If you're not sure where to start, try writing one sentence per step: "First, I open the file. Then, I read each line..."
Step 4: Pseudocode for FileAnalysis
Before coding the FileAnalysis class, create clear pseudocode for each method. Pseudocode helps you plan algorithms and project structure without worrying about syntax, making coding easier and providing a simple way to get feedback. It also lets you confirm with your instructor that you’ve understood the project requirements.
Pseudocode Resource
If you're unfamiliar with pseudocode or want to improve your pseudocode writing skills, consider referring to external resources such as this article: Pseudocode: What It Is and How to Write It.
-
Write Pseudocode for Each Method:
- For every method identified in the FileAnalysis class, develop pseudocode that outlines the step-by-step logic and functionality of the method. This pseudocode should be detailed enough to guide your coding process.
-
Use Plain English:
- Ensure that your pseudocode is written in plain English, devoid of any specific programming language syntax or code snippets. Focus on describing the logical flow and actions to be taken within the method.
-
Save Pseudocode Document:
-
Create a text document of your choice for writing the pseudocode. Name this document
plan-pseudocode. Save the document in the designated directory:projects/screenshots/project-1/plan. -
IMPORTANT: If your pseudocode is in a
.txtfile, avoid adding the.txtfile extension to the filename. GitHub is configured to ignore.txtfiles in the upload process, so it should be saved asplan-pseudocodewithout the extension.
-
Screenshots
Make sure you have both the screenshot of your class diagram in the projects/screenshots/project-1/plan directory.
Submit Project Plan
- Add, commit, and push!
- Verify the screenshot and your pseudocode are visible in GitHub.
- Create a new issue in GitHub: "Project 1 plan ready for review".
-
Copy the below text and paste it into the "Add a description" textarea. Answer the reflection question in the space provided.
@kkschumacher #### How will you use this plan to start the coding process for Project 1? -
Click "Submit new issue"
Important
The purpose of the planning step is to develop the logic and tests before coding. Therefore you must get a "met" on this assignment before moving on the coding or they risk not getting credit for your plan.
Rubric
All of the following must be satisfied to achieve a "Met" status
- Demonstrates a thorough understanding of the Project 1 requirements.
- Plan is shared in a such a way that instructor can understand the design and provide feedback.
- The class diagram provides the necessary classes, instance variables, and methods.
- Pseudocode for each method in the FileAnalysis class accurately describes the logic step-by-step.
- Pseudocode is written in plain English, avoiding specific programming language syntax or code snippets.
- The plan is visible in GitHub with an issue.
- Thoughtful response to the reflection question in the GitHub issue.
Making Corrections
I will provide feedback in the GitHub issue on your project plan. If you received a "not yet", simply make the necessary corrections and reply to the GitHub issue when you are ready for me to reassess your work.