Lab 1 - Set up
Attention
If you have a MacBook Pro with the M1 or M2 chip (newer model), see Part One - Alternate setup. Mac users can also do this if you prefer to run on your own machine rather then a virtual machine.
Part One - Setting up your Linux image.
- Download the virtual machine file and save it to your computer.
Extra Large VM (more memory) - After the file is downloaded, save a copy to an external drive, so that you have a reliable back-up copy.
- Unzip the downloaded file, if it did not automatically unzip.
-
Download and install VMWare Workstation (Windows) or VMWare Fusion (Mac OS X). You can access the installation file here:
- Scroll towards the bottom of the page and choose the "DOWNLOAD NOW" button, you do NOT need to purchase anything.
- Madison College will provide a longer-term license before the 30-day trial period is up. I will share more information on this process in the next couple weeks.
-
Launch the VMWare Workstation or Fusion application on your computer.
- Open the file named <...>.vmx from within VMWare.
- The Linux image will start booting.
- If you see the image below, choose "I Copied It".

- When asked, the login is “student”, the password is also “student”.
- You should click on the full screen button in the VMWare screen.
Part One - Alternate setup for MacOS M1 or M2 chip
You will only need this if you are running a MacBook with the M1 or M2 chip. VMware may not run on that hardware. 1. Install Homebrew - You may need to install the Apple command line tools prior to installing Homebrew - The command
xcode-select -pwill print the directory where they are installed - If you're on the latest MacOS, do a quick internet search for it - Older versions here https://developer.apple.com/download/all/?q=xcode - Homebrew is a package manager for MacOS. It if very helpful with installing and updating software. It's not the only way to do this. You can install all the necessary software yourself. But this is a convenient way that helps keep track of version etc. I will use this for setting up a Mac with all the necessary software. - You can find Homebrew here https://brew.sh/. Follow the instructions for installing it. 2. Now that you've got Brew installed, let's start installing all the necessary software for this course - If you don't have Java installed already, you'll need that to start. - You can check your version by runningjava -version. You'll want something recent; Java 11 or higher. - If you don't have java, you can use Brew for thisbrew install java- This will install the latest OpenJDK version of Java - If you runjava -versionnow and still see an error try this below command
orsudo ln -sfn /usr/local/opt/openjdk/libexec/openjdk.jdk /Library/Java/JavaVirtualMachines/openjdk.jdksudo ln -sfn /opt/homebrew/opt/openjdk/libexec/openjdk.jdk /Library/Java/JavaVirtualMachines/openjdk.jdk
- You should also be able to type `javac` on the command line and have the compiler respond.
- Now you will need to install Ant. This can also be done with Brew.
- If you are ever looking for something to install with Brew, either search the web or try
brew search whatever_you_are_looking_for - This will work for Ant
brew install ant
- If you are ever looking for something to install with Brew, either search the web or try
Part Two - Add git Config Global Entries
-
Open a Terminal window from the launcher.
-
Enter the following four commands in the terminal window. Make sure to change the second two to your information.
$ git config --global push.default simple$ git config --global core.editor code$ git config --global user.name "Your Name"$ git config --global user.email "your_email@example.com"
-
Run this command to verify.
$ git config --list
You should see something like this.
    $ git config --list
    push.default=simple
    core.editor=code
    user.email=MTasunka@madisoncollege.edu
    user.name=Maiara Tasunka
Part Three - Your first GitHub repository!
Before continuing, you will need your GitHub userid (the same userid that you provided to your instructor) and personal access token. As of August 2021, GitHub requires the use of a personal access token (PAT) when interacting with GitHub at the command line. Use these instructions to create your PAT. Please choose the Classic Token for this course.
In the lab steps below, when prompted at the command line for your GitHub password, enter your PAT.
Next, don't worry if you haven't used Git and GitHub before, we'll be learning much more about these in future lessons. For now, we are going to use a special part of GitHub's website, GitHub Classroom, to do some of the heavy lifting required to create a repository to hold your work for the semester.
Finally, don't worry if some of the images below look slightly different from what you see on your screen.
Ready?
-
To get started, click on this link. You should see a page something like this.
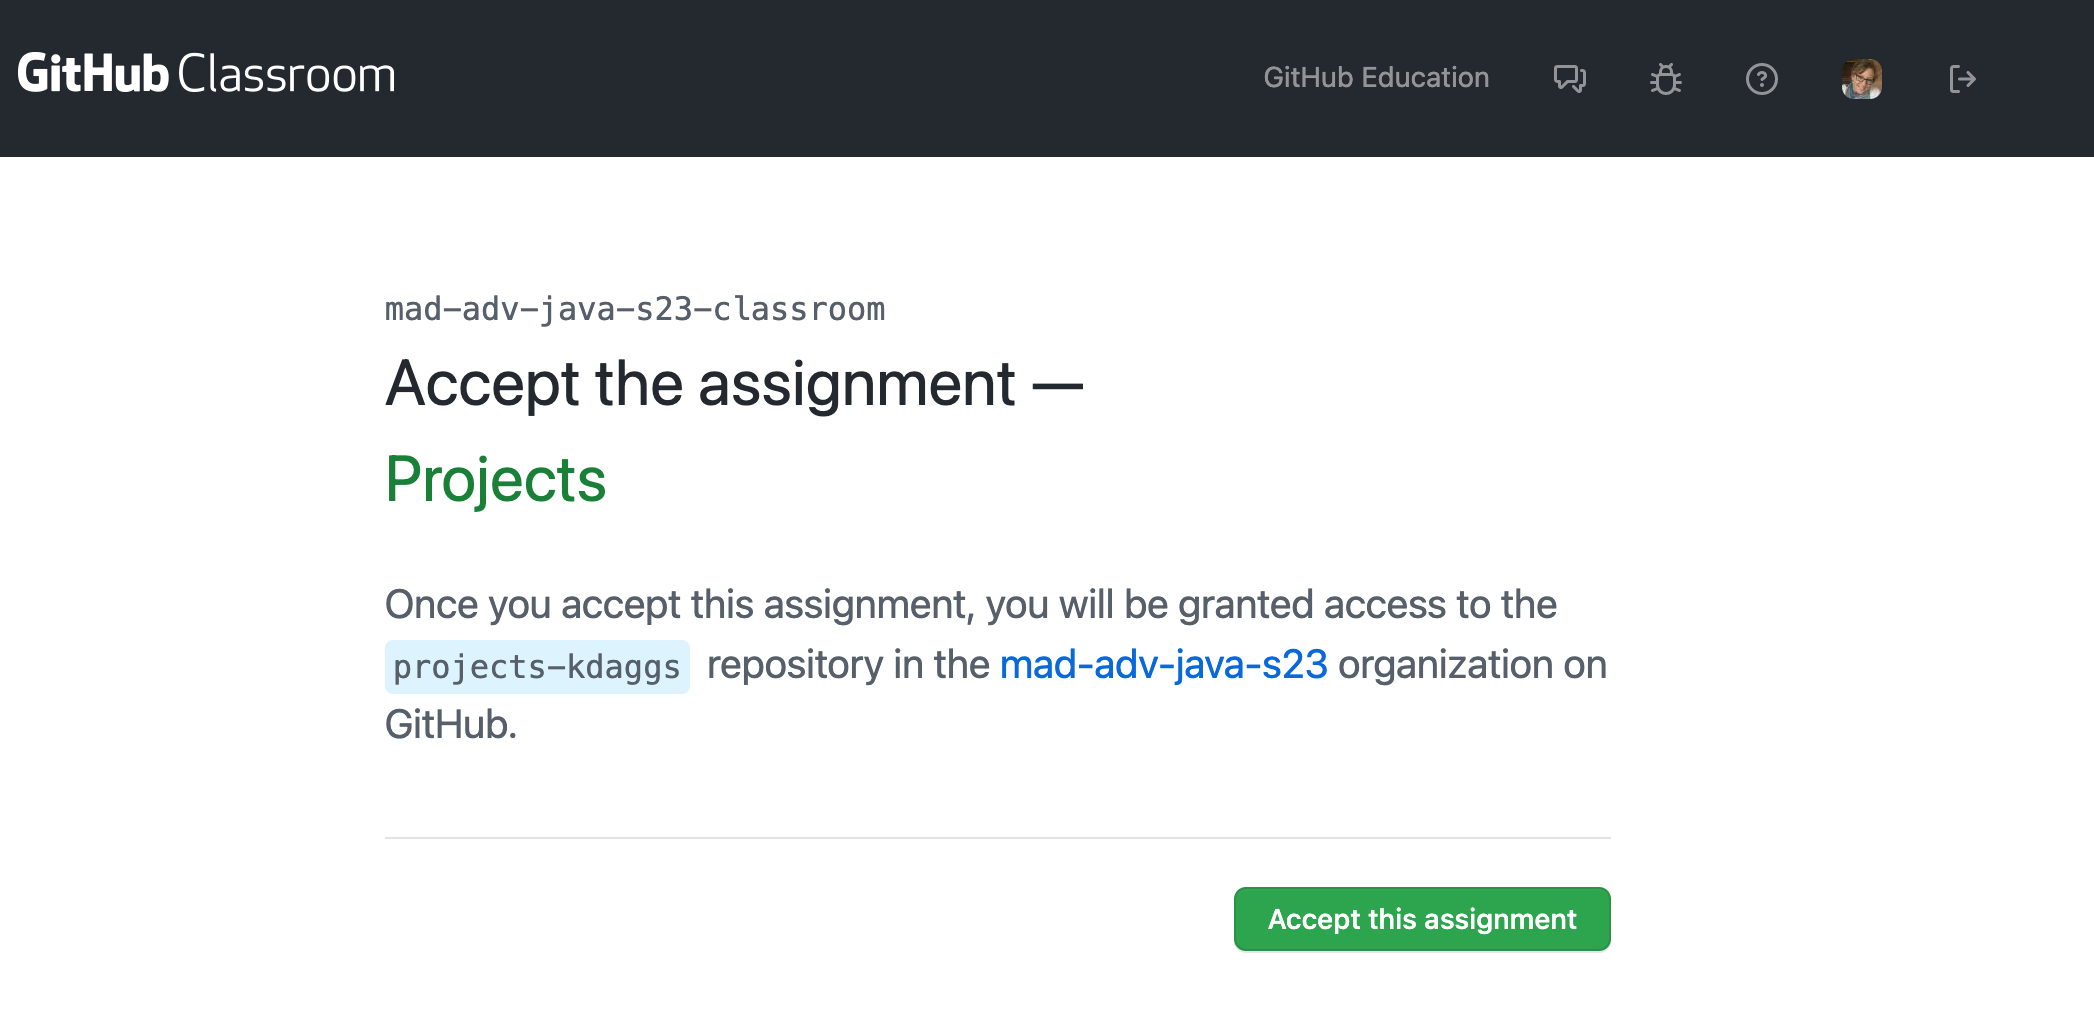
-
Click "Accept this assignment", which should take you to a page similar to the one below.
-
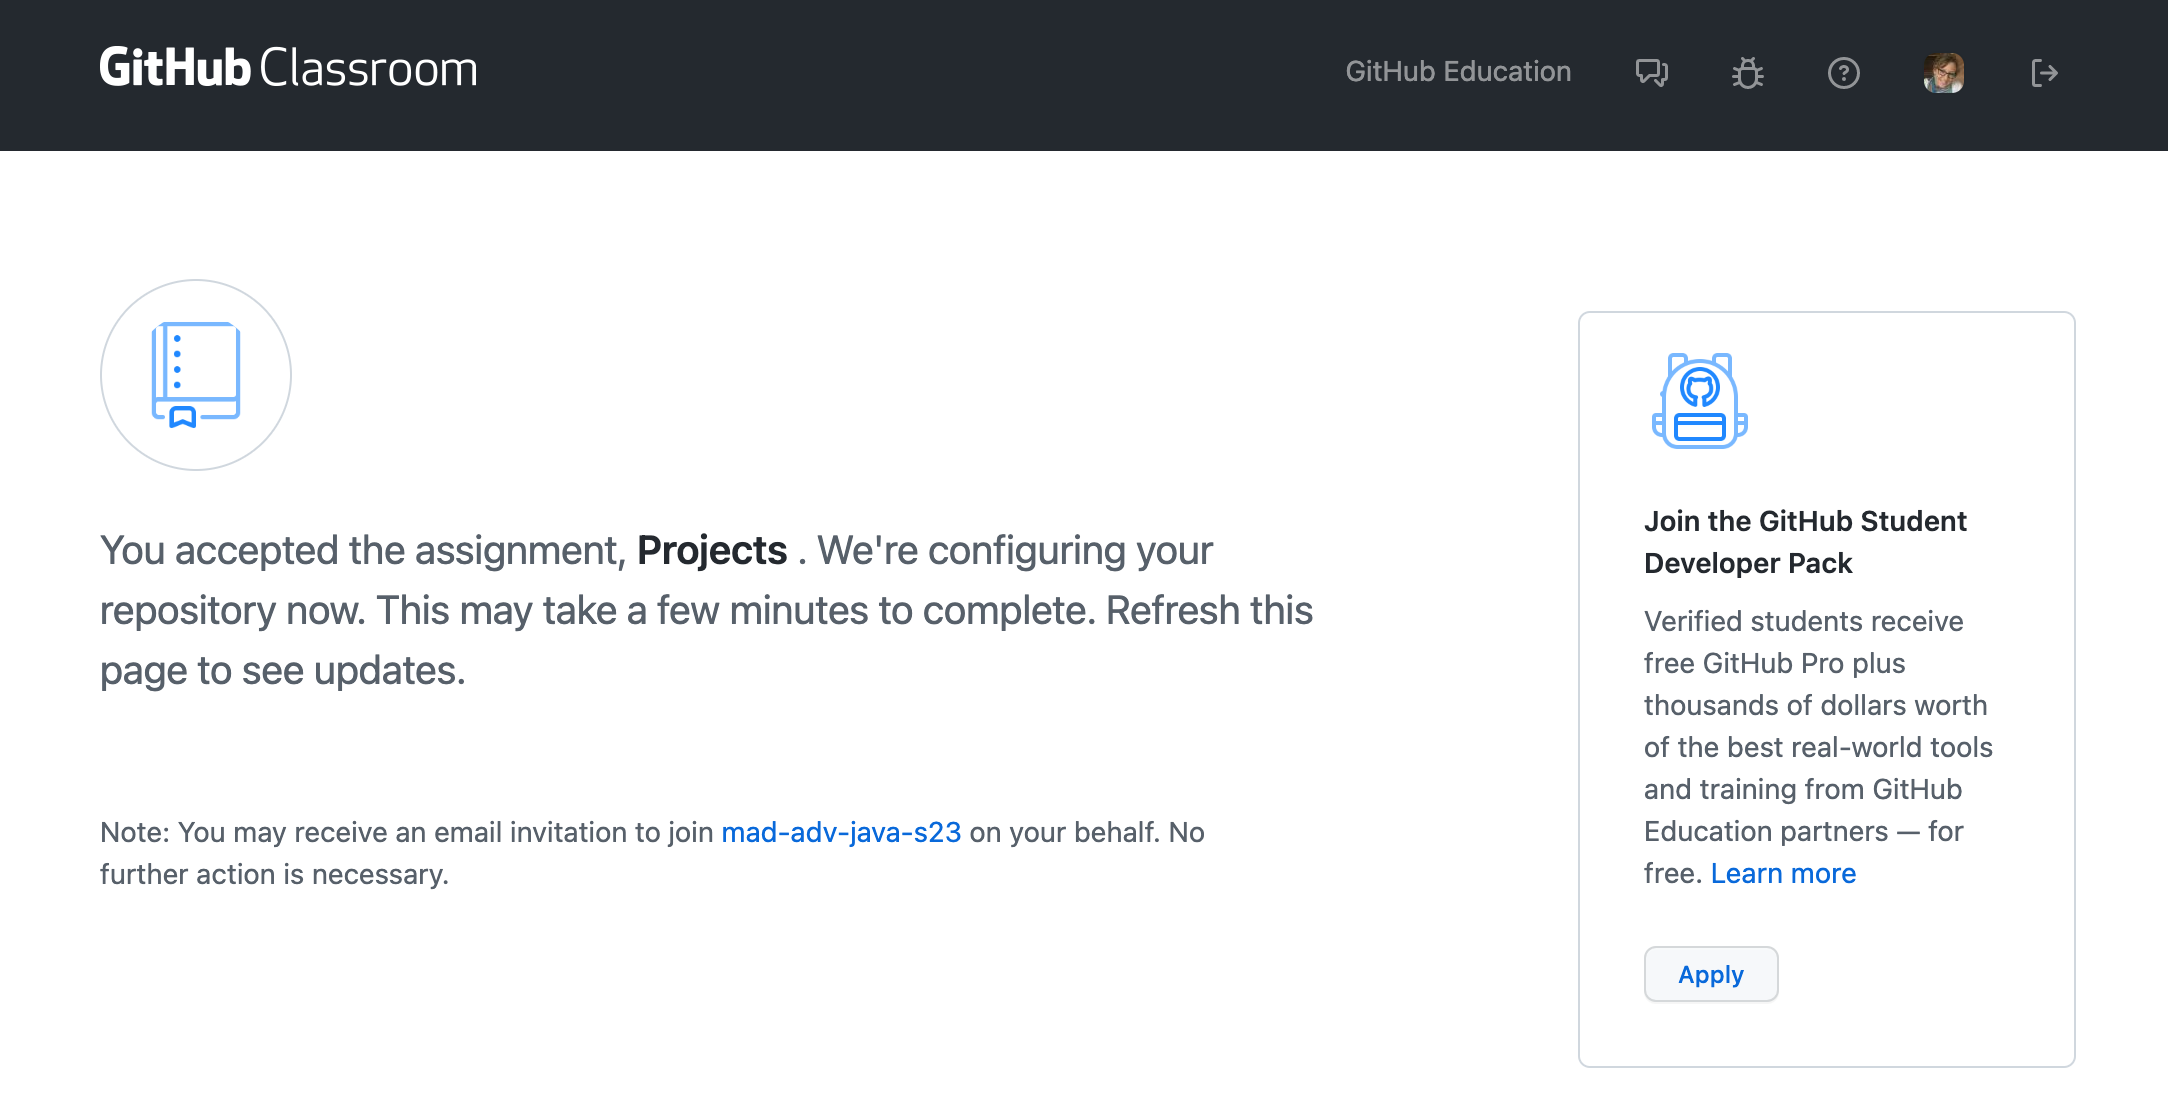
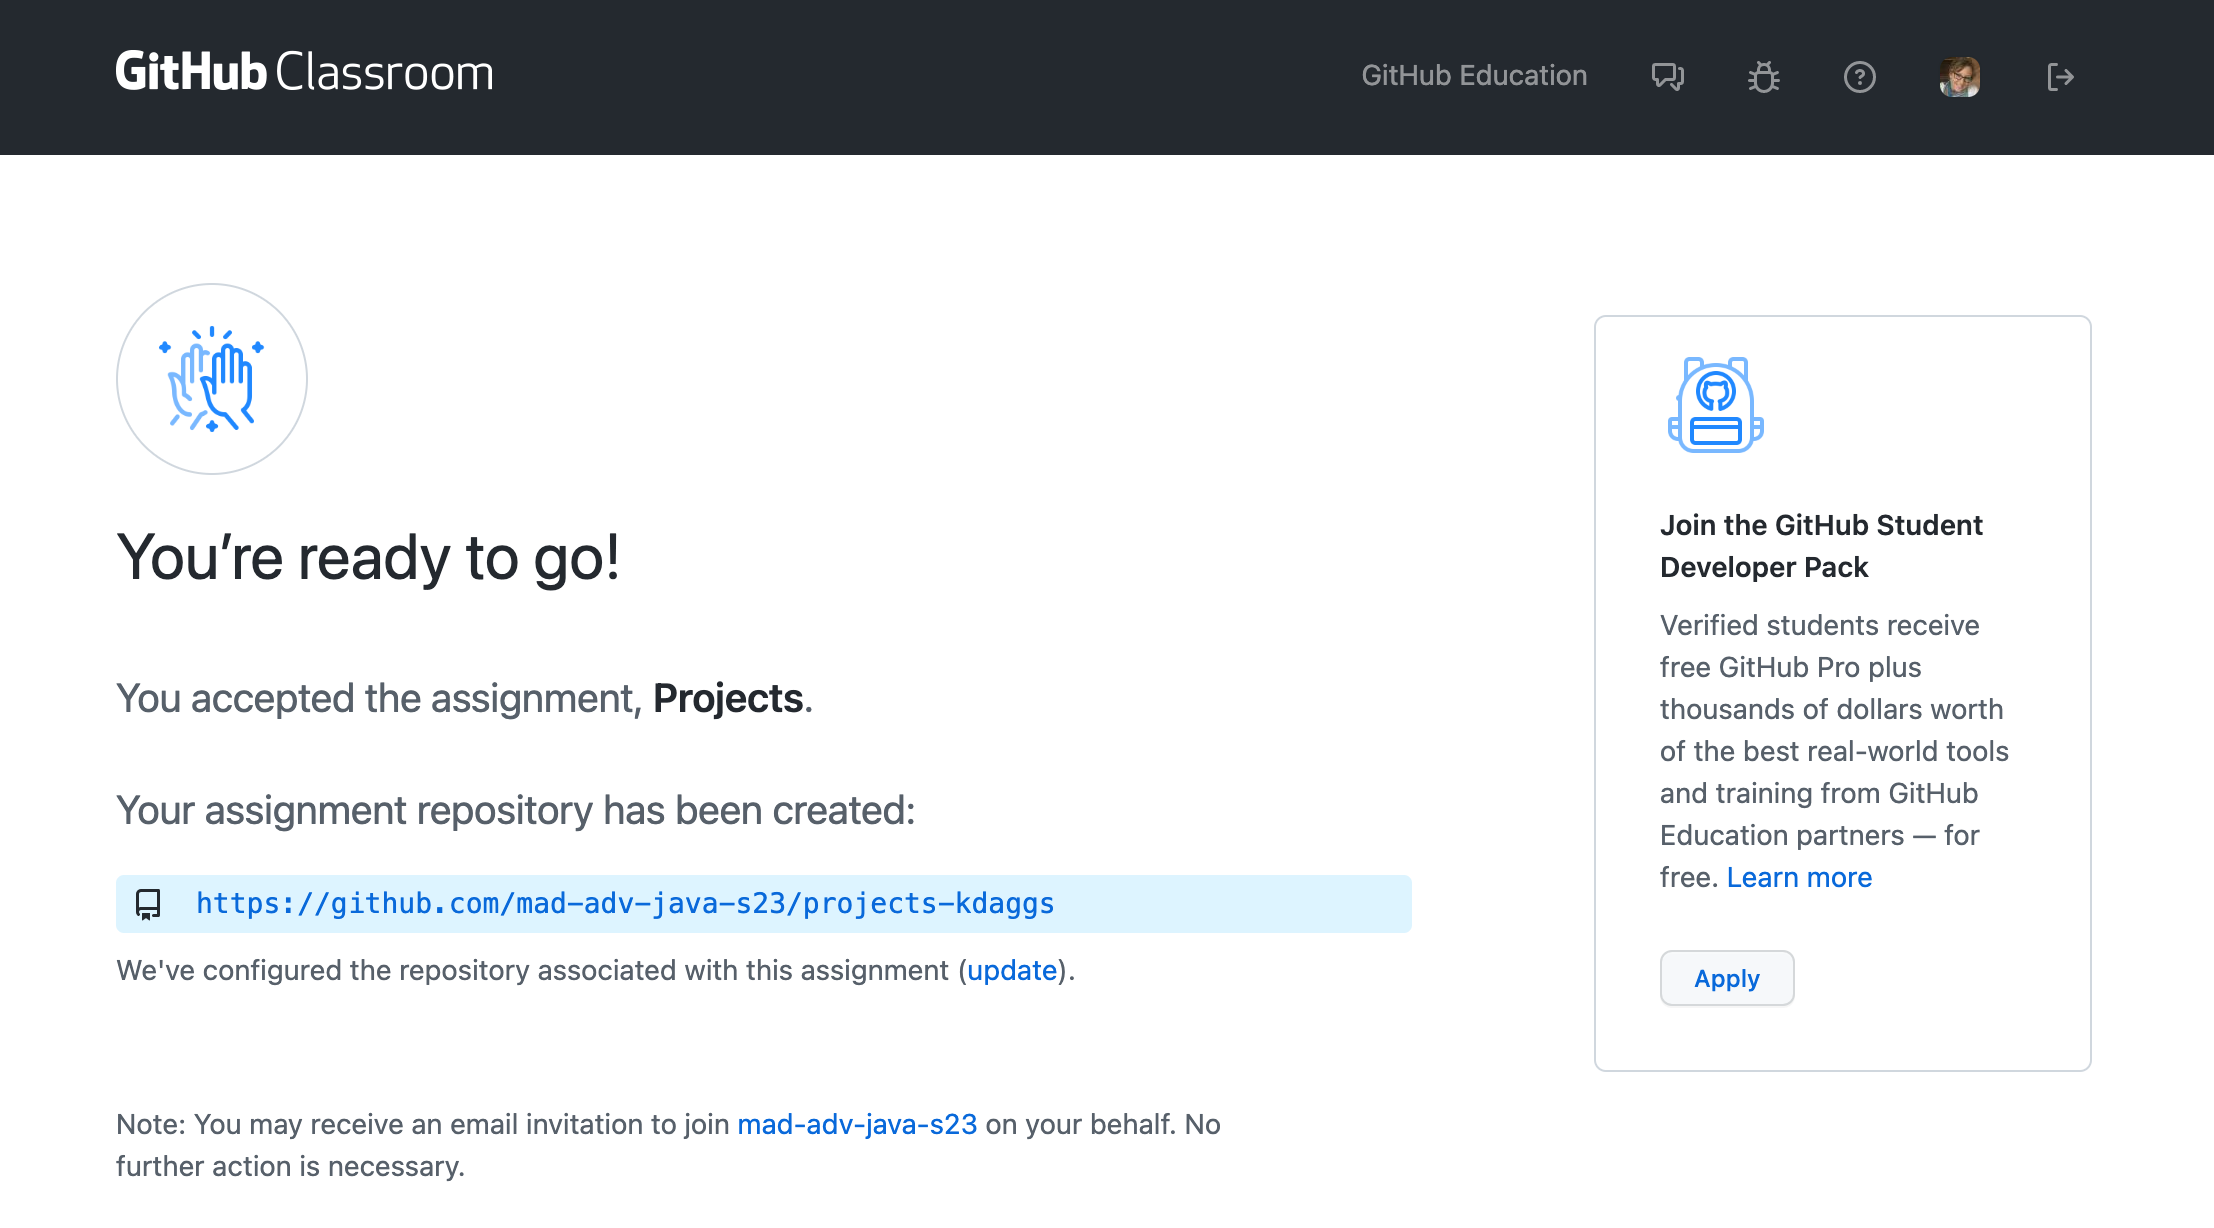
Wait a minute or two and then refresh the page. You will see a similar screen to the one below when the process is finished. You should also receive an email when the process is complete.
-
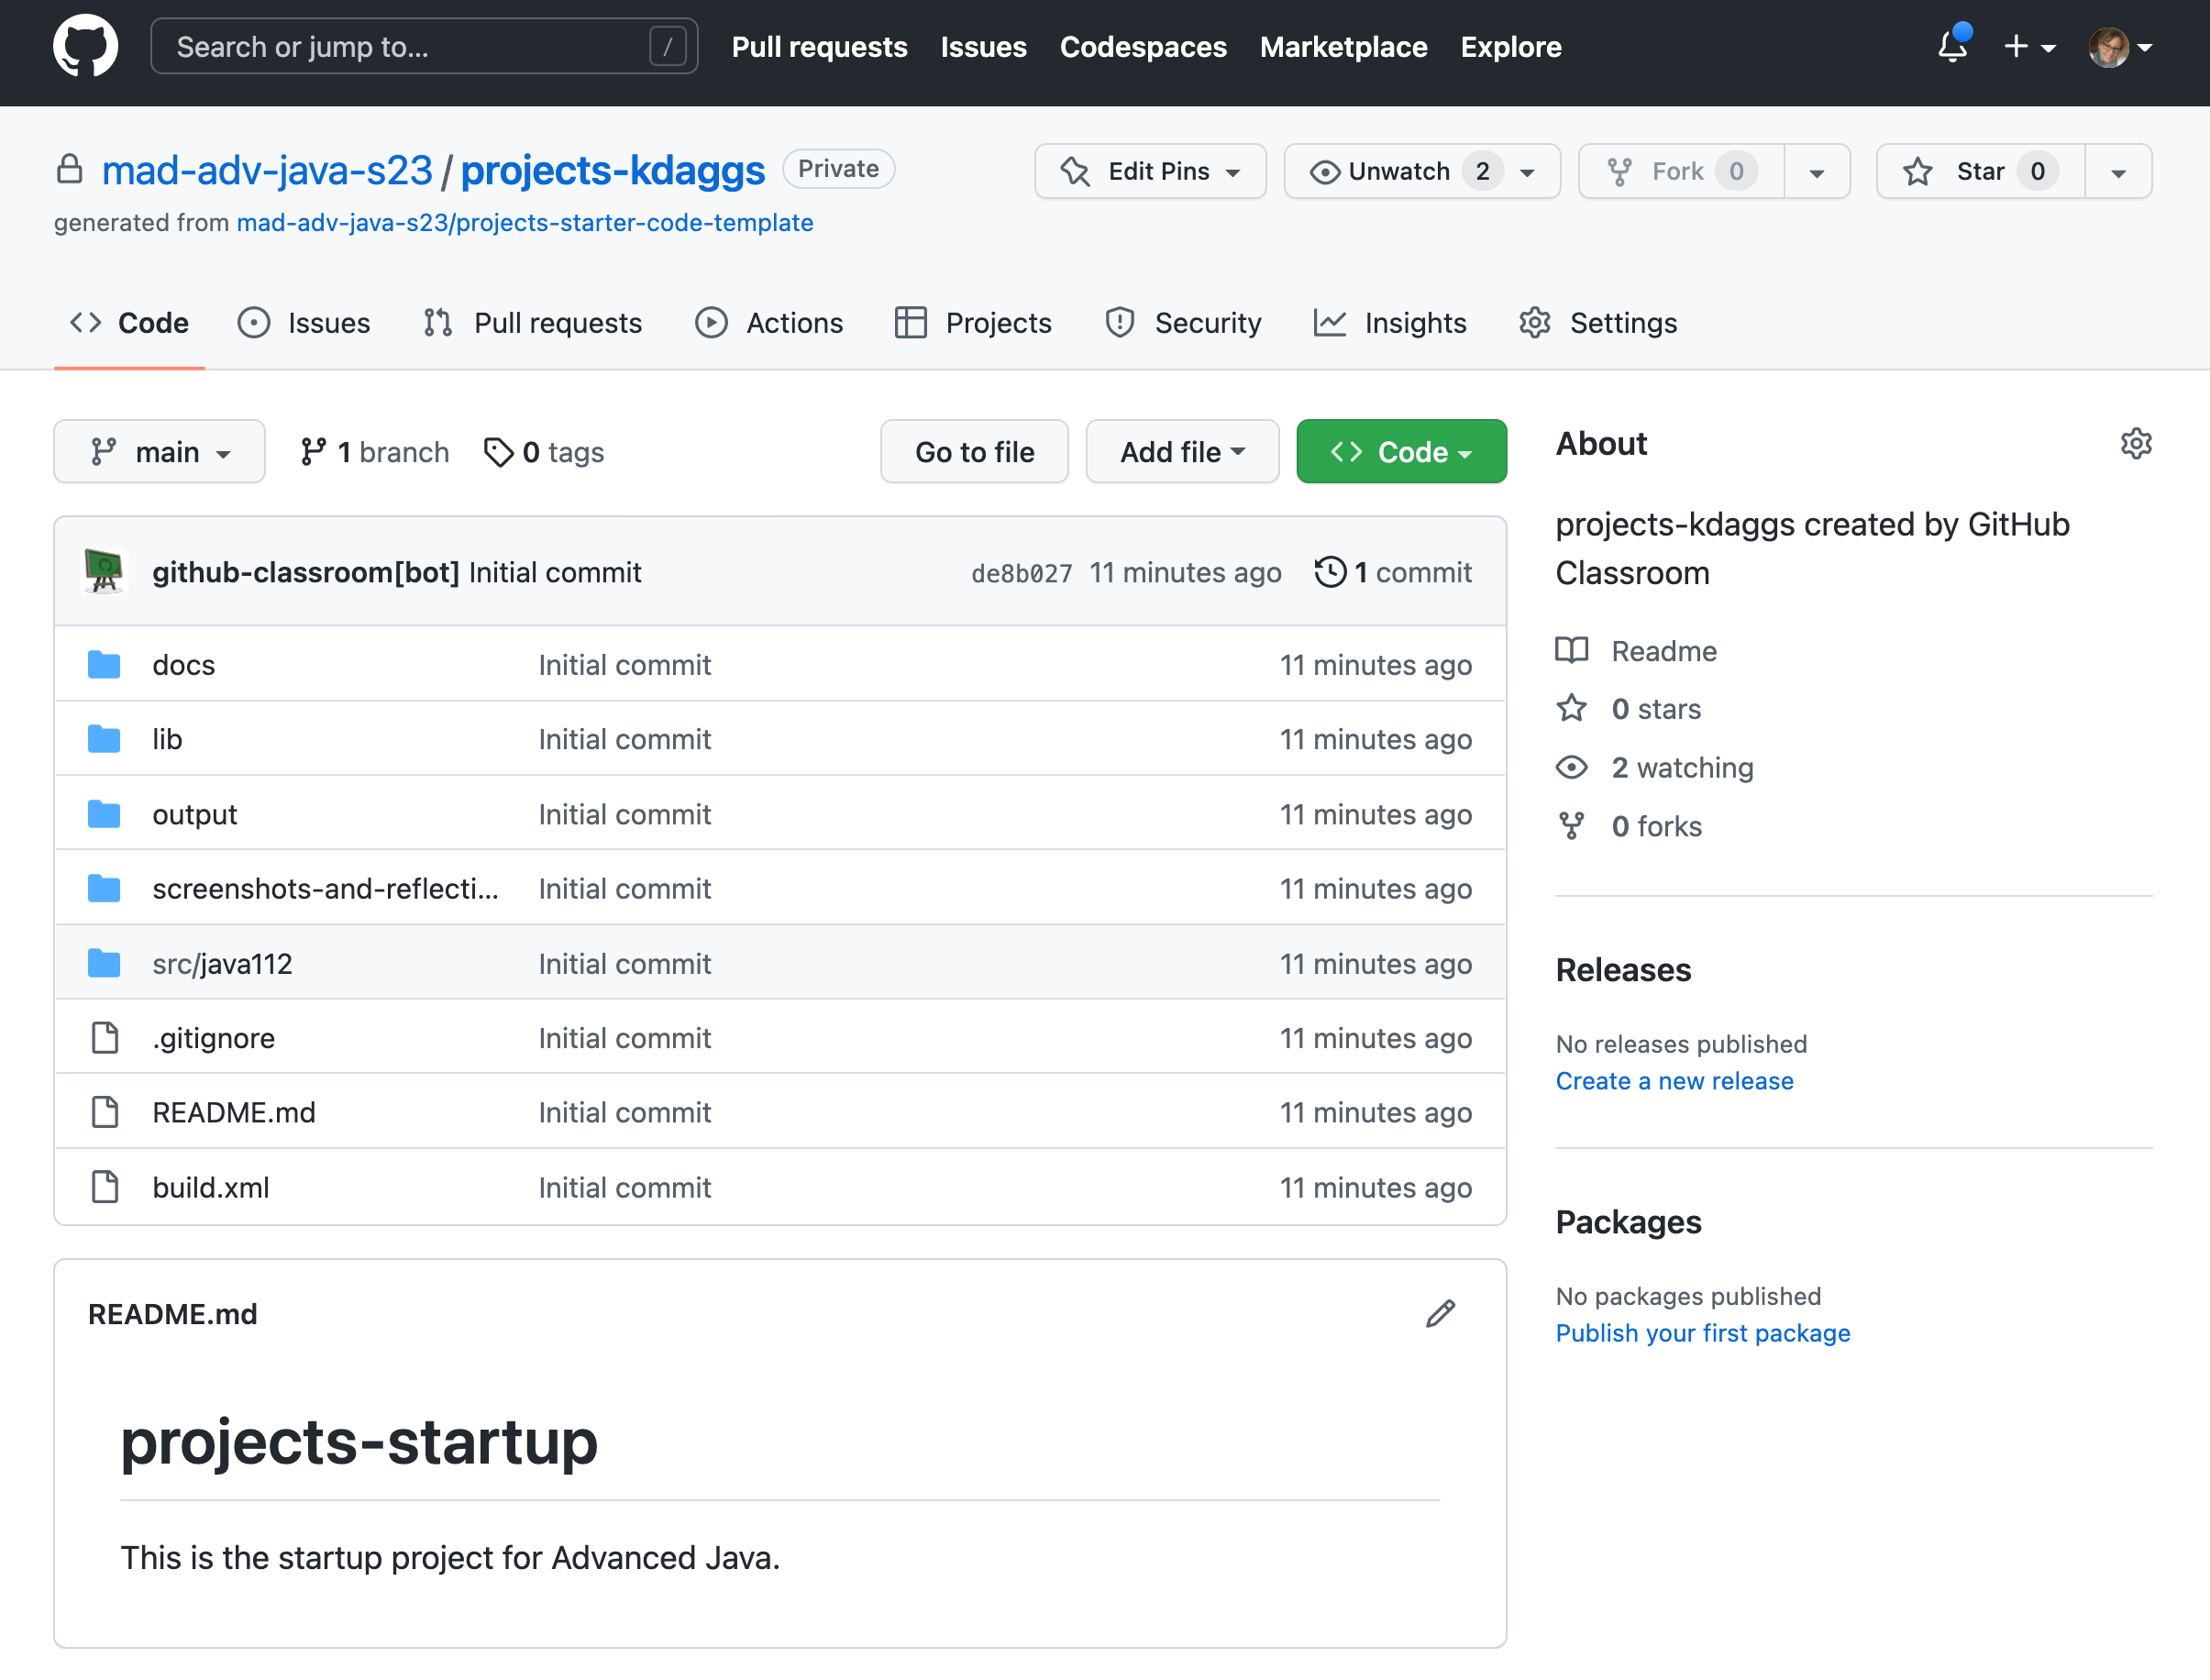
Click on the link you received above. You should see something like this:
-
Click on the "Clone or download" button. Then copy the url as shown below. We'll use it in just a bit.

Part Four - Starting Your Project... Finally!
-
Open a Terminal window from the launcher.
-
Create a GitHubRepos directory. Yes, this could be done with a mouse, too. We're trying to learn some UNIX here!
$ mkdir GitHubRepos -
Navigate to your new directory.
$ cd GitHubRepos -
Clone the repository from GitHub to your local machine.
$ git clone theUrlYouCopiedInTheLastStepOfPart4GoesHere -
This command should prompt you for your GitHub userid and password (PAT). After entering those correctly, the output should be something like this:
student@ubuntu:~/GitHubRepos$ git clone https://github.com/MadJavaAdvFall2017/projects-kdaggs.git Cloning into 'projects-kkdaggs@madisoncollege'... Username for 'https://github.com': kkdaggs@madisoncollege.edu Password for 'https://kkdaggs@madisoncollege.edu@github.com': remote: Counting objects: 15, done. remote: Compressing objects: 100% (13/13), done. remote: Total 15 (delta 0), reused 15 (delta 0), pack-reused 0 Unpacking objects: 100% (15/15), done. Checking connectivity... done. -
Let's take a look at what that command did. Use the following command to view the directory contents.
$ ls -al -
You should see output similar to this.
student@ubuntu:~/GitHubRepos$ ls -al total 12 drwxrwxr-x 3 student student 4096 Aug 21 20:48 . drwxr-xr-x 30 student student 4096 Aug 21 20:48 .. drwxrwxr-x 5 student student 4096 Aug 21 20:49 projects-YourIdHere -
Before we explore that directory, let's rename it to something a little more friendly, like "projects".
mv projects-YourIdHere projects -
Now let's look at the content of your projects directory. Enter this on the command line.
$ cd projects
$ ls -l
or just try l, which is an "el" not a "one".
$ l -
You should see output similar to this.
$ l total 40 -rw-r--r-- 1 student student 12090 Aug 27 15:33 build.xml drwxrwxr-x 3 student student 4096 Aug 27 16:06 docs/ drwxrwxr-x 2 student student 4096 Aug 27 15:50 lib/ drwxrwxr-x 2 student student 4096 Aug 27 16:00 output/ -rw-rw-r-- 1 student student 65 Aug 27 16:03 README.md -rwxr-xr-x 1 student student 81 Jan 24 13:11 src/ -
Let's also look at this directory in the another view. Click on the item that looks like a file folder.

-
Your projects directory should be similar to the one below.
-
Is that everything? Well, no. Let's look at everything with this command.
$ ls -al(Orll)$ ll total 56 drwxrwxr-x 7 student student 4096 Aug 27 20:54 ./ drwxr-xr-x 26 student student 4096 Aug 27 16:09 ../ -rw-r--r-- 1 student student 12090 Aug 27 15:33 build.xml drwxrwxr-x 3 student student 4096 Aug 27 16:06 docs/ drwxrwxr-x 8 student student 4096 Aug 27 16:12 .git/ -rw-rw-r-- 1 student student 126 Aug 27 16:07 .gitignore drwxrwxr-x 2 student student 4096 Aug 27 15:50 lib/ drwxrwxr-x 2 student student 4096 Aug 27 16:00 output/ -rw-rw-r-- 1 student student 65 Aug 27 16:03 README.md -rwxr-xr-x 1 student student 81 Jan 24 13:11 src/The
.gitdirectory is really important, that's your real repository. Don't ever mess with it.The
.gitignorefile is a list of things we want git to ignore. -
What's in that
.gitignorefile? Enter this to see it.$ cat .gitignorebuild/ dist/ docs/project_api/ output/*.txt output/*.dat output/*.TXT *~ TEST* lib/analyzer.jar lib/java112Labs.jar lib/*.war lib/*.ear .DS_Store hs_err_pid*These files, file patterns, and directories will be ignored by
git. -
Enter
git statuson the command line.$ git status On branch master Your branch is up-to-date with 'origin/master'. nothing to commit, working directory clean- branch
- master
- up-to-date
- origin/master
- commit
- working directory
- clean
There are a lot of new terms and concepts there. We'll start slowly and try not to get overwhelmed. We'll spend lots of time over the coming weeks learning more about git.
-
These are scripts that you will use to run some lab, demo, and project code. Learn more about the scripts here, and also download the scripts to your projects directory.
-
Now is also be a good time to set one additional git configuration so that your uid/pwd is cached for a short time while you are working. Enter the following four commands in the terminal window.
$ git config credential.helper store
-
One last thing, and this is very important: If you are running your VM on an external drive, always shut down your VM before ejecting the drive.

Lab Submission
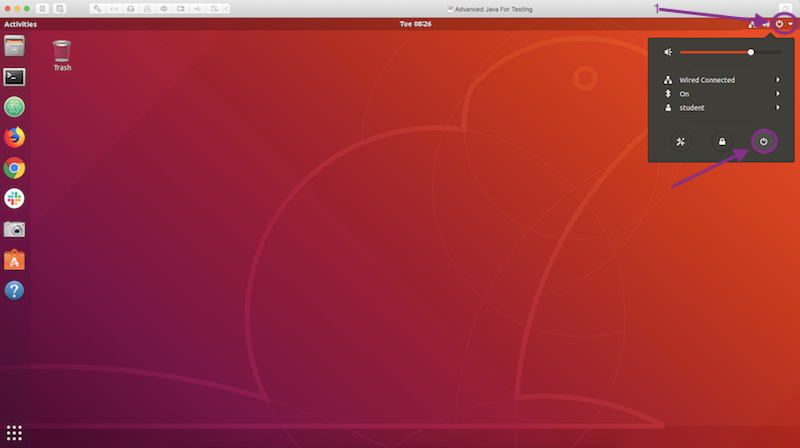
To receive credit for this lab, please use a Slack DM (direct message) to send your instructor a screenshot showing your projects directory in your vm. Be sure that the "Modified" column is visible in your screenshot as shown below.
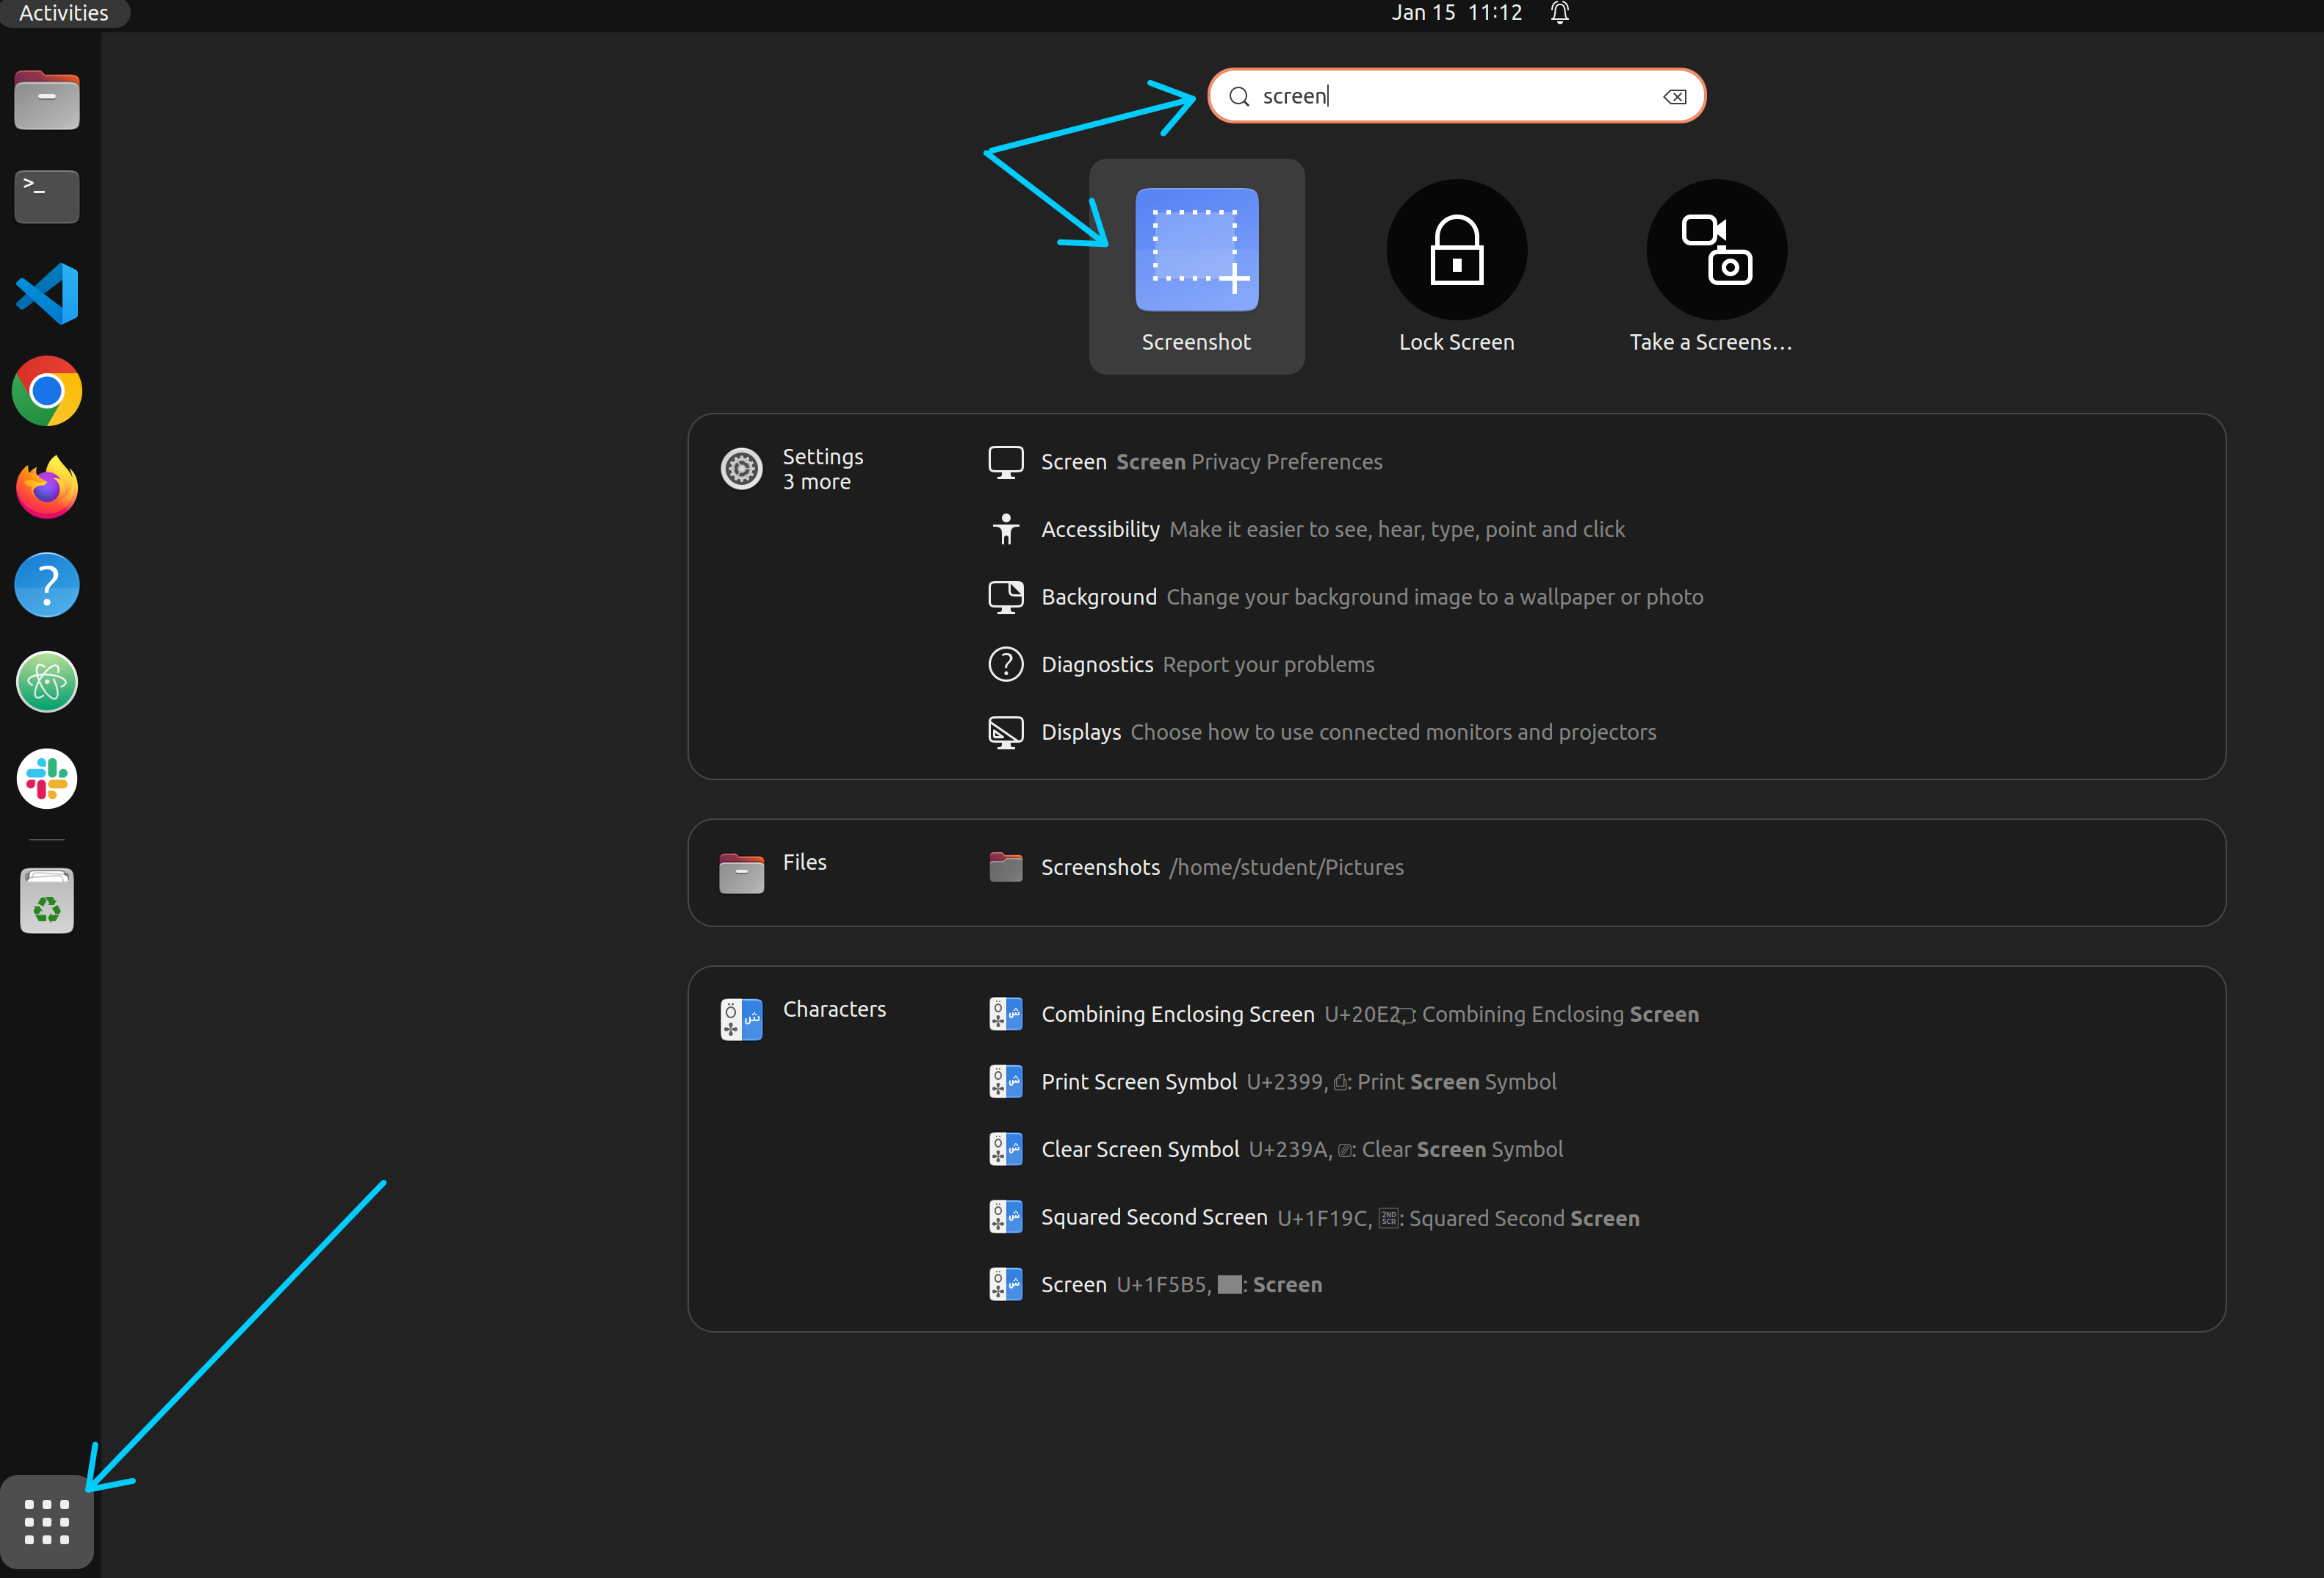
To take a screenshot, press the PrtSc key on a Windows keyboard. Or, you can click Apps icon in the bottom-left and search for screen.